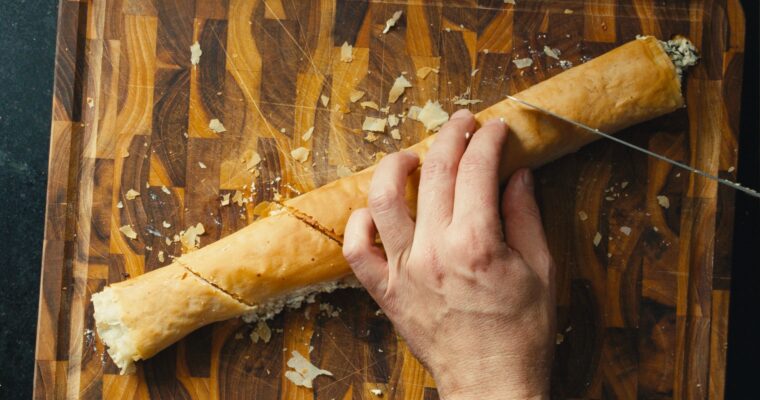
How about a Mediterranean escapade with this Feta Phyllo Roll recipe, where layers of crisp, golden phyllo pastry embrace a luscious filling of tangy feta cheese?Let’s raise the bar on your appetizer game effortlessly as this simple yet sensational dish takes center stage at your […]
Imagine the irresistible aroma of melted cheese, zesty tomato sauce, and your favorite pizza toppings wrapped in a perfectly baked puff. This homemade pizza puff recipe satisfies your pizza cravings and adds a fun and portable twist to the classic pizza experience.Start your ovens! What […]
Imagine a golden-brown exterior giving way to a fudgy, melt-in-your-mouth center, sending waves of chocolate bliss through your taste buds. This isn’t just a recipe; it’s a journey into the heart of chocolatey decadence. Let’s dive into perfection with these irresistible homemade chocolate brownies!
You’ll need:
1 cup superfine sugar 3/4 cup of cocoa powder 1/2 cup of all-purpose flour 1 Ts of baking powder 1 cup and 2 Tb of butter (two sticks and 2 Tb) 7 oz semi-sweet chocolate chips
Bring your oven to 350 F (177 C) and line a baking sheet with wax paper.
Mix 1 cup of superfine sugar, 3/4 cup of cocoa powder, 1/2 cup of all-purpose flour, and 1 Ts of baking powder in a large bowl. Next, break four large eggs in a bowl, beat them lightly, and set them aside.
Add 1 cup and 2 TB of butter and 7 oz semi-sweet chocolate chips in a separate bowl. Add water to a saucepan, and place the butter & chocolate bowl on top. This is what they call a bain-Marie, where you gently melt the chocolate and butter. Put these on a medium heat stovetop, and let the water simmer. Keep stirring until the butter and chocolate are completely melted. You can add nuts or dried bits of fruit to the mix if you wish.
Pour the melted chocolate and butter into the dry mix bowl and stir well into a smooth, velvety mix. Next, add the beaten eggs and continue stirring. Keep mixing and folding until silky smooth.
Pour the mix on the wax-paper lined sheet and spread it around for a rough ½-inch thickness. The mix will be thick enough to keep its shape.
Place the sheet in the oven in the middle rack, and set your timer for around 20 min. Turn the sheet 180 degrees after 10 minutes of baking. For gooey brownies, the central part should still be jiggly.
Set the pan on a cooling rack. It will set once it cools off, resulting in a delicious texture. Transfer to a cutting board or cut the brownies into chunks directly in the pan.
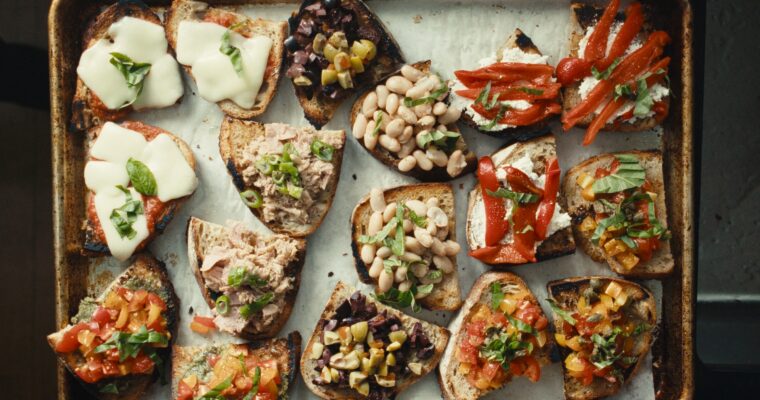
How about trying a tempting 7-way bruschetta recipe, where each bite is a symphony of flavors? From classic tomato and basil to innovative roasted pepper and feta cheese pairings, this collection promises a delightful explosion of taste and texture. Elevate your appetizer game and impress […]
You will hit the jackpot with this homemade tomato pasta, where the rich embrace of ripe tomatoes, garlic, and fresh thyme transforms a simple dish into a symphony of rustic Italian flavors. Homemade Tomato Pasta Recipe FOR THE PASTAthree large eggs3 cups all-purpose flour1Ts kosher […]
Let’s hop on a culinary journey to the French Riviera with our Niçoise Salad. This vibrant dish combines fresh cherry tomatoes, Kalamata olives, green beans, and canned tuna with hard-boiled eggs and a tangy Dijon vinaigrette. A taste of the Mediterranean in every bite!
And it is as easy to make as ever.
THE DRESSING:
1/4 cup freshly squeezed lemon juice
2 Tbs Dijon mustard
3/4 cup extra virgin olive oil
1 Tsp kosher salt
Ten turns of freshly ground pepper (1/4 Tsp)
INGREDIENTS:
10-12 fresh cherry tomatoes
One can of solid tuna in oil
1 cup sliced radishes
2 Tbs caper berries
20 small Cornichon pickles
3/4 cup green olives
4-5 Pepperoncini peppers
3/4 cup black olives (Kalamata)
3/4 sliced pickled red peppers
4-5 artichoke heart quarters
3 sliced small cucumbers
8-10 shoots steamed asparagus
1/4 lb steamed green beans
boiled baby potatoes
Two halved-boiled eggs
Start with whisking together the dressing ingredients and set apart. Arrange Niçoise salad ingredients on a big platter for a colorful look. Drizzle with the dressing and sprinkle some kosher salt and freshly ground pepper.
Embark on a flavor-packed journey to the streets of Mexico with this tantalizing taco dinner! Picture sizzling seasoned meats, zesty pico de gallo, creamy guacamole, and a tortilla embrace. It’s not just a meal; it’s a taste bud fiesta! Prepare for a culinary adventure, making […]
Indulge in decadence with this irresistible chocolate tart, with luscious layers of velvety cocoa, and embrace your taste buds in a symphony of pure delight! THE CRUST: ¾ cup butter (I tend to prefer salted)½ cup granulated sugarPinch of salt2 cups all-purpose flourOne orange zest […]
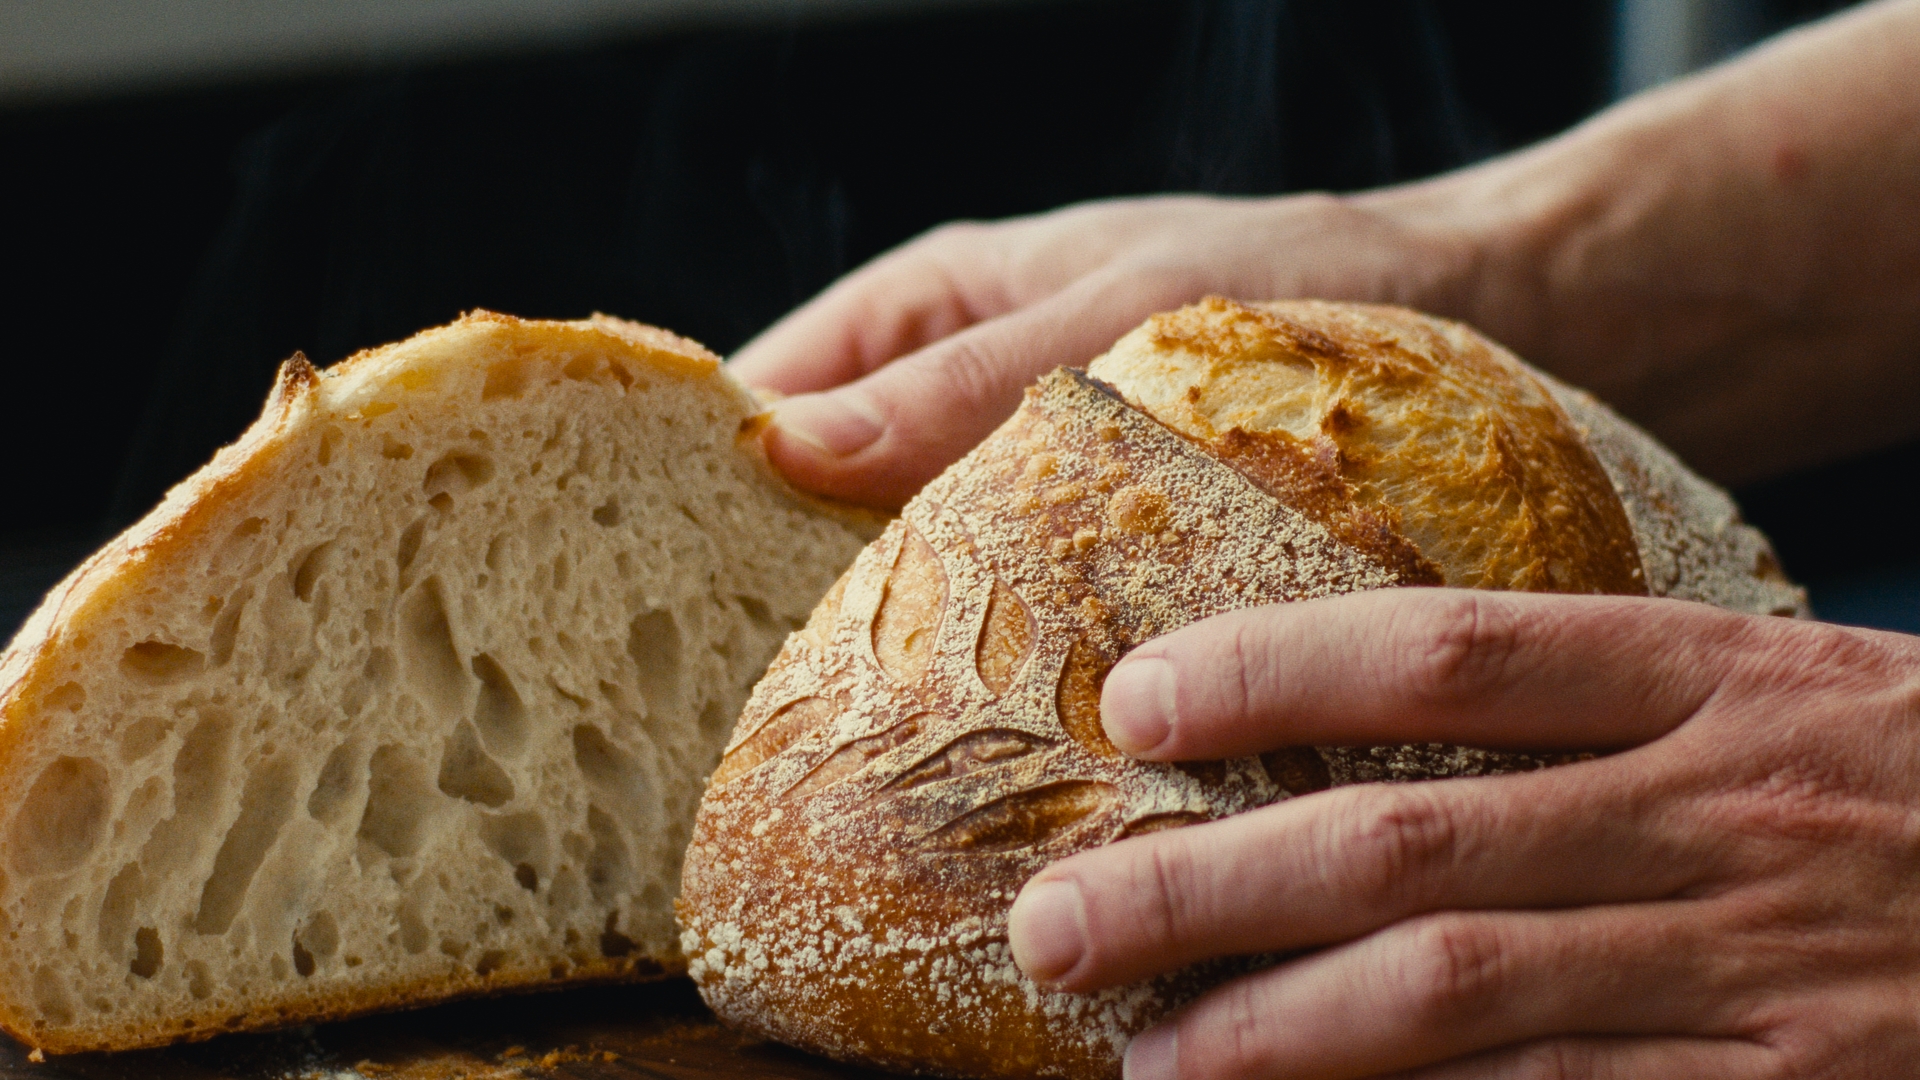
Here’s the process I’m using for my basic sourdough bread. Even if it looks like it has a lot of steps, it’s a simple recipe once you get started. I’ll assume you already have the starter. I will make a separate video on how to get one going if you don’t have one yet.
The whole process consists of 4 main chapters:
Feeding the starter
Mixing the ingredients
Stretching & folding
Baking
FEEDING THE STARTER:
sourdough starter
4 Tbs all-purpose flour
1 Tbs dark rye flour
about 1/2 cup of warm water
FOR THE BREAD:
150g peaked sourdough starter
750g bread flour (I’m using King Arthur’s 12.7% gluten content)
510g warm water
50g warm water + 1 Tbs kosher salt (dissolved)
Sourdough usually improves flavor if you keep the dough in the fridge for 1-3 days. Don’t go longer than that since it might lose its potential to rise.
So, typically, if you want your bread today, start it at least a day ahead.
DAY 1: Begin in the morning by feeding your starter and mixing it to form a thick pancake-like batter. Add a rubber band as a reference for the starting level and set it aside in a warm place on the counter. I like to place it in a sunny spot. The yeast will thank you. It usually takes about 3 hours for my starter to peak (meaning it reaches maximum volume).
Follow up with measuring and mixing together the bread ingredients in a big bowl. Start with the flour and continue with the starter. I add the flour and starter in the same bowl and just hit the tare button on the scale after each ingredient—less stuff to clean up.
Add the 510g of water, and using a spatula or a wooden spoon, mix everything together into a shaggy dough. It’ll look dry at first, but it will start getting moist as the flour absorbs the water. Continue kneading for a minute or so with your hands, then cover it with plastic and let it sit in a warm place for 30 min. Do not over-knead. I used a kitchen aid to mix before, but I learned that you get a much denser crumb as opposed to the nice irregular holes, which makes the bread more airy. After the 30 min rest, add the 50g of water with the dissolved 1 Tbs of kosher salt. Keep kneading for 2 minutes until most of the water is absorbed. The dough will feel wet and loose, but don’t worry; it will become smoother in the next steps. Leave the dough to sit for 30 min covered.
Fold & Stretch: This technique will develop the gluten structure in your dough, making it chewy. After that 30 min, grab the side of the dough, stretch it up, then fold it over itself. Repeat this with the sides. Cover and let it sit for 30 min. Next, repeat this step two more times. Some people do it more often, but I didn’t notice a difference. You will notice that with each fold & stretch step, the dough will become more springy and smother. It will be tacky but not sticky.
Pre-Shaping: Dump the dough on the counter and gently tuck the bottom sides with a plastic paddle. Dust with flour, cover with a kitchen towel, and let it sit for 10 min.
Shaping: Divide the dough into two halves with the paddle. Take one half and stretch it gently into a rough, oval shape. Then, gently bring the two opposite sides over the middle. Do the same with the other two sides. Place the dough with the seam side on the counter, then gently form it into a ball shape by tucking the bottom side in as you turn it. Use the paddle to help tuck the bottom in as you’re turning. This will help add surface tension to the bread. Don’t worry, it doesn’t need to be perfect, you’ll get better with each bake. Place the round ball into a well-flour-dusted proofing basket seam-side up. Sprinkle some cornmeal on top, and place it into a plastic bag in the fridge. Repeat this with the other half of the dough. Again, you can leave it in the fridge for up to 3 days (I left it once for four days, and it was fine).
Baking: On baking day, set your oven to 500F (260C) and place a cast iron Dutch oven in the middle rack. We want the Dutch oven to heat up together with the oven. Be careful when you take it out of the oven it will be BLAZING HOT! Meanwhile, cut a 15 x 12 inches piece of parchment paper and fold it in four. Then, cut it into a P-shape form. This will be our handy bread sling, with two handles to lower our bread into the scorching Dutch oven. Take one basket out of the fridge, place the parchment paper on top, and carefully turn it over on the counter. Gently pull the basket off. Using a sharp lame (or box cutter blade) score superficial slits into the surface of the bread in a fun pattern. Use your creativity here. These are only for decoration. Next, cut a deeper slit into the middle of the bread. This cut will allow the bread to rise while in the oven. Take the Dutch oven out and, using oven mittens, gently lower the bread into it using the two side handles of the parchment paper. Place it back in the oven and set your timer for 18 min. After 18 min, take the lid off (USE OVEN MITTENS!), lower the oven temp to 425F, and bake for another 18 min. Take the Dutch oven out and place the bread on a cooling rack using kitchen tongues. I know you’re tempted to cut it open, but let it sit for 15 minutes to cool down. The bread needs relaxing after being in the oven. Just like you! You can repeat the baking process for the other basket.
If you’re like me, you probably associate summer with fresh salads of all sorts, straight from your garden. One of these is Tabouleh (Tabbouleh) which packs major key veggies and herbs like cucumbers, tomatoes, parsley, and onions.


 facebook
 instagram
 twitter