Croissants – A La Julia Child

In honor of my culinary hero Julia Child and upcoming movie about her life Julie & Julia (where Meryl Streep plays Julia Child, and Julie Powell is played by Amy Adams) I decided to bake one of her recipes from her TV show The French Chef With Julia Child 2 – Croissants.
Although the process might sound intimidating it is in fact quite simple. Hey – if a rookie like Julia could make it, you can make it too! I will go with you step-by step as presented by Julia in her show. Read along – it is fun and delicious!
Julia Child, More Than A Character
As she goes through her rolling pins collection in the Croissants episode of her late 1960’s TV show The French Chef, where she flamboyantly throws one of them in the trash bin, concluding that “It’s good for nothing, I don’t know why I keep it”, or as she encourages you to take heart when you flip anything in a pan to do it with the “courage of your convictions”, while she spills most of her potatoes on the stove top, Julia Child – the pioneer of cooking shows, gives hope for cooking newbies like you and me who feel so small and intimidated while watching modern big-wig cooking shows where everything turns out perfect, manicured and shiny!
I was extremely excited to hear of the Julie & Julia movie and from what I’ve seen of the trailer, Meryl Streep does an outstanding acting in playing the role of this extraordinary woman! Can’t wait to watch it on 7th of August!
Le Croissant
Considered the donut rival in America (and rightly so), the croissant gained quick popularity in every pastry shop, continental breakfast plate, and even in donut chains. Charles Dickens wrote about the Croissant in his 1872 All Year Round periodical, “the workman’s pain de ménage and the soldier’s pain de munition, to the dainty croissant on the boudoir table“.
But it’s humble origins are mentioned long before that year, when August Zang (an Austrian artillery officer) opened the Boulangerie Viennoise in 1838 in Paris featuring the popular kipfel, that inspired the French pastry chefs to roll out a nationalized version calling it Le Croissant, due to its crescent shape.
Le Recipe
As intimidating (and cliche) as it probably sounds – if you can make a humble omelet, you CAN bake a beautiful batch of 12 Croissants. I mustered up enough courage by watching Julia’s episode on how to make Croissants, and being baking a couple of successful batches since then – well, one of them turned out more browner than needed as I left them in the oven too long [ahem!]. The nice thing about it is that the dough can be prepared ahead of time, and frozen so when you are planning on baking, all you need to do is to get your oven going and your appetite. There are a lot of Croissants recipes, I am sure, but just for the sake of celebrating the movie and the women who inspired it, I’ll stick with her version.
[ad#300×250-green]
Flour Options
Probably the most important step in the recipe is to use the right flour type for this type of pastry. Julia suggests using a low-gluten flour so the dough can be easily rolled without becoming rubbery, etc. You could for instance use a mix of 1 part unbleached all-purpose and 2 parts unbleached pastry flour. She also adds tasteless oil to the mix, to help tenderize the dough.
Yeast Dough
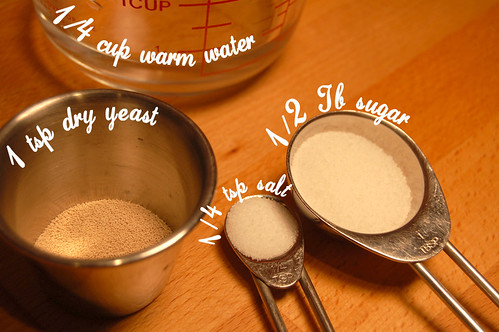
Even if today’s dry yeast has a very small chance of failing to do its job, I will give it a chance to prove itself to be worthy of our croissant dough.
1 Tsp dry yeast
1/4 Tsp salt
1/2 Tb sugar
1/4 cup warm water (not more than 110 degrees, otherwise you’ll kill the yeast)
Start by mixing all these ingredients with the warm water until dissolved, and let it sit for 5 min. If the yeast is active (and it should) it will form a soft foamy mass on its surface:
Croissant Dough
No big secret here to be learned. Make sure that when you measure “1 cup of flour” you actually sweep off the excess with the edge of a knife so you will have a consistent quantity. The quantities given here are good for a batch of 12 croissants. I usually double it and freeze a half of the dough (after I have the butter in it).
2 Cups of your flour mix (see Flour Options above).
1 Tb sugar
3/4 Tsp salt
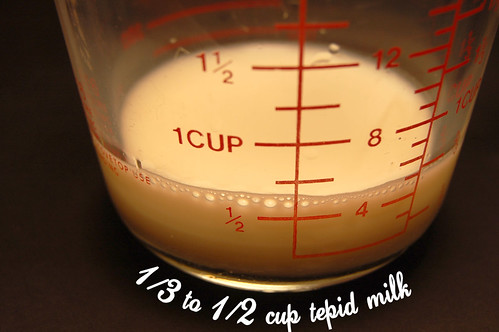
1/3 to 1/2 cups tepid milk
if using unbleached flour: 2 Tb vegetable oil (I used Canola)
if using bleached flour: 4 Tb vegetable oil
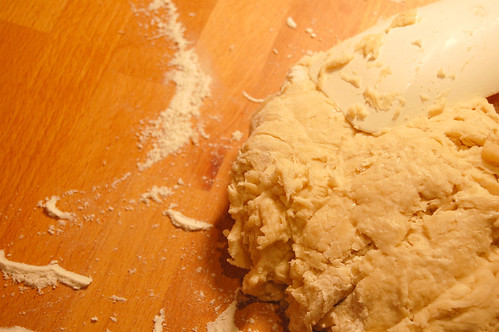
Blend all the above in a mixing bowl (don’t forget the yeast mix) with a spatula into a sticky mass, then out on the board:
Time for some punching – works well when you are mad. Julia suggests the lift-and-throw motion and as she talks and demonstrates the moves, the dough gets stuck to her pastry scraper and goes flying as she exclaims “Whew!” and goes on with her explanation without any trouble… Typical Julia Child! Love it. Un-edited fun!
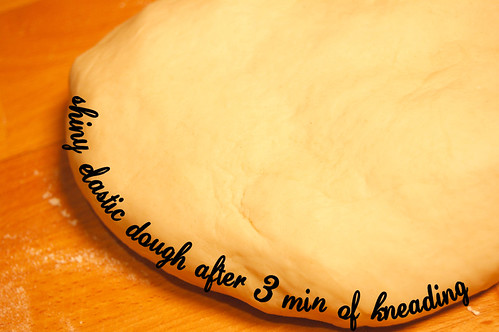
Keep on being rough with your dough for about 3 minutes – it’ll be somewhat sticky at first but after a good rapid fold and knead with the heels of your hands it will become elastic, smooth and will not stick to your hands anymore:
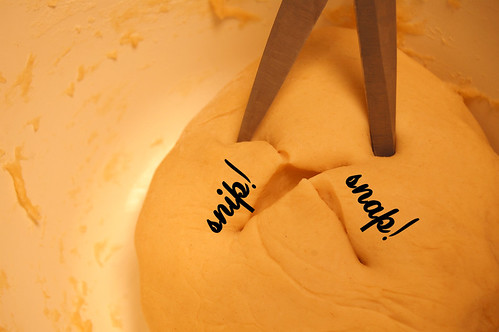
Time to rise. Plop the dough into a bowl and do a criss-cross scissors snip on its surface to help it rise. Then cover it with a plastic wrap, and let it rise until it becomes double in bulk:
Rising time depends on the room temperature. I found that if I do this in the summer, rising is faster than in winter. About 1 to 1-1/2 hours at say 75 degrees will suffice. Don’t keep it in temperatures higher than 85 degrees or longer that needed (over-rise) since that wll impart an unpleasant taste. At this point you can retard the rising by placing the bowl in the refrigerator:
Then, punch it down into a flat circle, wrap it in wax-paper and chill it for about 20-30 minutes. The chilling is important as it makes working the dough much easier: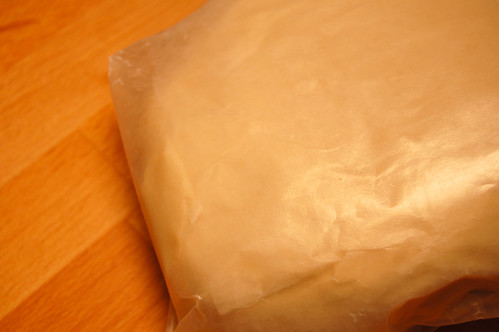
Rolls, Turns and Chills
If the croissant recipe would be considered a somewhat complicated procedure, than this particular step would probably be the one that will need more attention. What makes this basic yeast dough (good for bread, etc.) become a croissant dough is a good old stick of chilled butter. It is butter that makes the world turn. And it is butter that will make the 82 dough layers for our croissants:
Time is now to beat the daylight out of this chilled butter with your rolling pin. The idea here, my friends, is to work the butter into a malleable consistency, free of lumps and very fast, to keep the butter cold – working with melted butter is just not fun:
Then finish this procedure by pushing the whacked butter bits by bits out with the heel of your hand, so it is completely lump-free:
Lovely, huh? Having fun yet? Now, press your dough (I roll it) into an approximate 9″ diameter circle, then form the butter into a 5″ square (square-ish in my case) and place it on the top of your dough (centered):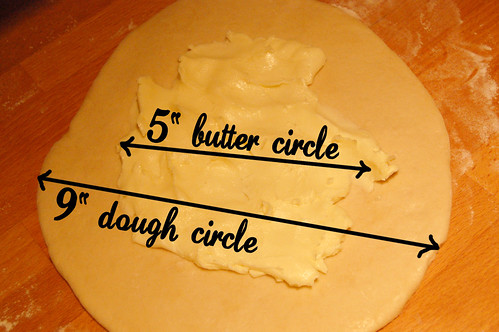
Now gently flip the dough edges (without ripping it!) over the butter and seal in the butter by pinching the dough: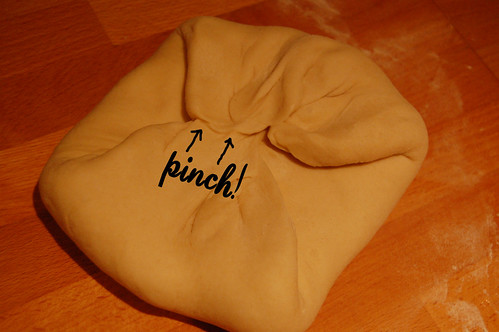
Voila! now you have a nice package of dough with a stick of butter inside, ready to be massaged into many layers. For that, flour your rolling pin and both sides of your dough, place it on your board with the seal side up and start gently rolling back and forth from the center towards the edges to form a rectangle of about 15″ long and 5″ wide. It doesn’t HAVE to be exact, but try to at least get close to that dimension. If there are butter bits that poke through, just pinch the dough over that spot to re-seal it. Also, if the dough became too rubbery (read warm), chill it again for about 20 minutes and continue from where you’ve left it. What you want here is to evenly spread the butter between the two dough layers (this gets you ready for your next step):
Turns #1 and #2
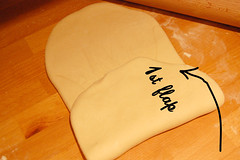
Okay. What’s a turn in culinary lingo? Julia Child defines it as having the dough folded like a business letter in 3 even layers. And really, that’s exactly what it is. Gently fold the bottom of your rectangle to the center of the dough then fold the top flap over it the same way. That’s defined as turn #1:
Then once again, roll out the dough to the initial 15″ long and 5″ wide rectangle to prepare it for turn #2 just as before. Keep the edges as straight as possible (I re-align them with the rolling pin). You will see that it will look more like a rectangle than before. Rinse and repeat – you got it right?
By this time (after turn#2) your dough needs some chilling to be able to roll it another 2 turns. Leave it folded as a business letter, flour it lightly, wrap it in wax-paper and place it in the fridge for about 1-2 hours: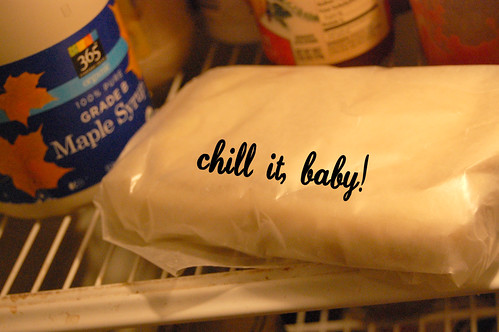
Turns #3 and #4
After the time spent in the fridge (1 to 2 hours) the dough is relaxed and ready for turn #3 and turn #4. Really nothing special here. Just repeat the same process as for the previous two turns – two rollings into the 15″ long and 5″ wide rectangle and two business letter style folding. You will end up with 81 layers of butter between 82 layers of dough. Again, by this time the dough is probably getting to rubbery to work with, so back in the fridge it goes for a 2 hours chill.
Croissants Shaping
After the 2 hour chill, out of the fridge the croissant dough comes and onto a lightly floured board. This time roll it into a 20″ long by 5″ wide rectangle. Try to keep the edges as straight as possible: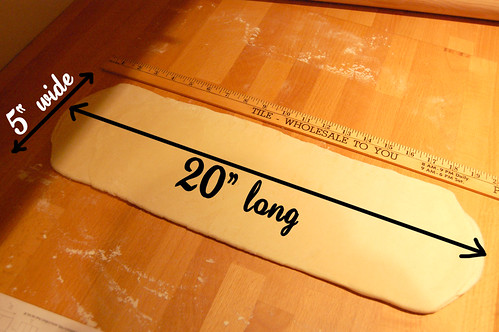
Next, make a middle crosswise cut and chill one half: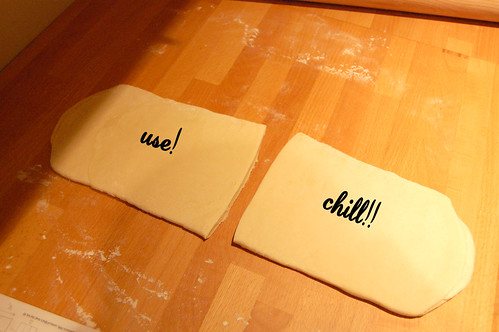
Now, roll the one half of the croissants dough into a 12″ long by 5″ wide rectangle and cut it in thirds and chill two of the thirds:
Now take one of the thirds and roll it into a 5-1/2″ square and cut it on the bias. Mine here doesn’t look terribly square-ish but you get the idea:
Roll the triangles out to extend to about 7″ long and shape it as much as you can into a isosceles triangle (where two sides are equal in length). Now starting at the base, roll up the dough towards the tip of the triangle, then bend it into a crescent moon form, and place it on a buttered 12″ x 14″ baking sheet (not too close to each other so they don’t fuse together while rising and baking) with the tip of the triangle on the bottom so that it wouldn’t unwrap during baking. Form the rest of the dough the same way into a total of 12 croissants, and let it rest for an hour covered with a plastic wrap. This might be a good time to get your oven going – set it to 475 degrees (mine takes about 45 minutes to heat up). You can freeze the risen croissants for later baking and pop them in the oven while frozen:
Glazing and Baking
Again, no rocket science here. Simple egg-wash. Paint the risen croissants with one egg beater mixed with 1/2 Tsp water:
Then pop them in the pre-heated 475 degree oven and really – keep an eye on them because they bake very fast. Usually something between 10 to 15 minutes depending on how dark brown you want them to look. Don’t do any other activities during this fast bake – you will forgot about the oven like I did so many times. I tend to leave them in until they turn dark-brown. Let them cool on a rack for about 10 minutes and resist the temptation of eating – the are HOT!:
Voila!
Julia mentions in the episode that she could eat Croissants in the morning, for lunch, for dinner, mid-morning or mid-night snack and so on. And I don’t blame her. These evil Croissants are so wicked delicious that can be enjoyed throughout the day. I tend to like them in the morning and for lunch, as a sandwich, or simply with any sort of jam or marmalade. Too bad we don’t have Le Figaro, the French news paper that Julia grabs at the end of the show while sitting down and enjoying her caffé au lait, and freshly baked croissant.











 facebook
 instagram
 twitter
i need your croissant recipt in kg please it’s very nices
Tina! Thanks much!!!
Hi,
I made these croissants yesterday, and they were delicious! Thank you so much for putting up the pictures and instructions. I never knew croissants had so many steps to making them, and was intimidated, but also surprised at how great they tasted. I live in Denmark where croissants are on every corner at bakery’s but they are $2.50 – $4 per croissant. These I made tasted as good as the $4 ones. 🙂
Anyways, I increased the milk to 1/2 a cup instead of 1/3 cup since the dough was too dry. I also used all-purpose flour, and I baked them for exactly 10 minutes, and they were perfect! I had a little trouble with shaping the dough in the beginning, as I wasn’t sure, which part of my triangle was the base, but I figured it out. Thanks again!
Michelle
I am a beginner at baking and before I start I would like to know if altitude will have a negative reaction to this recipe?
I live in Santa Fe, NM and we are at 7000+.
Thanks,
Melinda
How do I roll the croissant to get the design you have?you posted no pics of that procedure…
Hi! These look amazing. Thank you for posting pictures for each step. They really make a difference. I want to make these this week but I dont have 8 hours in a row to devote. Is there any way I can divide the work into 2or 3 days?
thanks for the comment, Sylwia! You sure can. You can basically just keep everything in the fridge over night. So for instance, you could do the dough the first day, including rising then leave it in the fridge overnight and to the turns, etc. the next day (then back in the fridge it goes). Then the 3rd day you can do the shaping, and baking. Hope it helps!
Christine. You just start with one of the triangle edges and roll it up like a carpet. Then just bend it a little so it resembles a crescent moon. hope it helps.
Melinda… not sure what to say. I would keep an eye on the rising process.
Michelle! Thanks for the reply and tips! Good point about increasing the milk amount! thanks!!
Wham! Wham!! Cannot wait to make these!
Well, I would love to have these croissants, but who has all these 1-2 hours of chill time available? I am happy if I have 2 hours to cook anything. Can this chill act be expedited somehow? freezer? 🙂
Csaba
Hello! Many thanks for sharing this wonderful recipe and the step by step photos. I had my first ever atempt yesterday, it looked the part but didn’t taste as good as I thought – the the water was too hot when mixed with yeast and sadly killed it + probably didn’t give enough time for the dough to rise enough either. Having another go tonight, wish me luck!
Great pastry, awful math!!!
(54 layers of butter between108 layers of dough)
Oops! My bad!
Make that yes, 81 layers of butter, 162 of dough.
See? Better than advertised!!!!
Yi – yes – if the water is too hot, you can easily kill the yeast. Use lukewarm water instead. Let me know.
Csaba – I am afraid they cannot be expedited. But your hard work will be rewarded!
Just a heads up, if you guys want a faster product with the same amount of layers, the four fold is the way to go. The three fold shown is the traditional route but a faster way we learned in school is the four or book fold. You only need to turn the dough twice, but actually get a few more layers in the end product.
You fold each end half way in and meet in the middle, then you just fold in half like closing a book. You must roll the dough out to about 20″ long to make it possible but a lot less folds cuts that process almost in half.
Let me know if you need help learning it.
-Crystal
Csaba,
Yes you can use the freezer, we actually used the blast freezer sometimes, just check on the dough in about 15 mins depending on your freezer. If the dough is too cold it will break will you try to roll it though. If you do get it too cold, bang it down with the rolling pin a few good times, it will still be tuff to roll but it should help it.
Amazing photos, great job. Thanks!
Thanks for the wonderful picture filled instructions. Is a stick of butter 8 oz/one cup/half a pound?
I’ve made croissants one other time and was not pleased with my results. I’m going to give this recipe a try, and strongly suspect that this recipe will give me the flavor I am hoping for as the differences in this recipe verses the other are very obvious. Thankyou for sharing. I will post my results tomorrow.
Gabi:
I used to make croissants regularly but that was over 20 years ago. Tried this recipe and another one I found on the web. Wanted to test them out before Thanksgiving. These are amazing! I should never have doubted Julia’s recipe and your techniques. The photos were very helpful, although I still had to re-roll the first few as I rolled from a long side and not the short side. After I figured that out, it was great.
My guests will thank you as well.
And they turned out wonderfully. This is officially my go too recipe. However I did have to chill the butter before it was usable in my croissants. Just didn’t stay cold enough. Also, wrapping little pieces of chocolate in them is to die for!
Ally! Thanks much for the feedback! Yes the butter needs to be chilled. It helps. I never tried it with pieces of chocolate! Good idea!!!
Diane! Thanks so much for your reply! It makes my day to hear that a recipe is actually successfully tested out there. Indeed Julia knew what she was doing. Hope your guests had a great time for Thanksgiving!
Ally – thanks for the reply! Any tips you would share with us that might be useful? Thanks!
Paul – I believe a stick of butter as referred to in the US, weighs 1/4 lb.
Yes – I second Crystal’s advice. I also pop the dough in the freezer for 15 minutes, only keep an eye on it. Every freezer is not created the same.
Crystal! Thanks so much for the tip! This is PRECIOUS info! Indeed the book method makes way much sense. Thanks again!
Love love love you for this blog! They are amazing. I live at high altitude and have made no adjustments, they come out perfect. Today I did chocolate Croissants. Thank you so very much for sharing a set by step recipe. I am about to try filling them when a cream cheese cherry filling. Happy holidays! You are the best!
HOT TIP FOR CHILLED BUTTER
Obviously this is fabulous recipe which I wouldn’t dream of changing! That said, I did put my own little twists on the butter handling which worked wonderfully for me.
I took room temperature butter & whipped it up with the whisk attachment on the stick blender in a small mixing bowl. Then turned it out onto half of a 12″ sheet of wax paper, folded the paper over the top, and molded my 5×5 square. Then I fridged it long enough to roll my dough into a 6″ square. Just long enough for the butter to be perfectly chilled and peel off the wax paper easily. Now I place the butter like a diamond within the dough square, flap over the corners to meet in the center & pinch together. Maybe let it sit for a minute or two to ‘unchill’ a bit, then continued on the recipe as described!
I hope you’ll try it Gabi, and let me know what you think!
Thanks!
Wendy! Thanks for sharing! This is brilliant! Such a simple yet clever trick. I can already imagine this will work with no doubt. Thanks much for sharing!
Oops! Let me correct an error in that previous post. The dough should be an 8″ (not 6″) square to accommodate the 5″ square butter. Sorry!
Hi. I was surprised to see the addition of salt in the yeast dough stage. Salt kills yeast while sugar feeds it. My guess is that the small amount of salt compared to the larger amount of sugar results in a reduced overall benefit of the yeast. Basically if you omit the salt, I think you’d get more bang for your buck from the yeast. Although I am in no way going to contradict the methods of Julia and the obvious success of this recipe from all the comments. Just curious as to why you’d add salt that early in the process. In culinary school we learned to add salt a little later in the process, after the flour, to begin to kill the yeast slowly. Salt kills yeast when they are in contact with each other and I think the point of having the flour in there first is that the salt comes in contact with the yeast less often, creating a slow kill of the live yeast. If anyone is having trouble with getting the yeast to be bubbly and happy at the beginning, I’d consider holding off on the salt rather than thinking your packaged yeast is dead. Any experience with this? Great site! Love the photos.
I went through a million croissant recipe posts, but yours was the only one that gave the the courage to actually do it. Everyone else seemed to stress on how difficult it was and simply frighted me.
Kudos on the pictures and thank you for this wonderful and encouraging post.
Tina – Thanks much for the feedback! This makes my day! Cheers!
Good point. Not sure to tell you the truth. Take for instance the notorious Sullivan Street Bakery No Knead Bread. You have 1-1/4 teaspoon of salt with only 1/4 teaspoon instant dry yeast to 3 cups of flour, mixed with water and left overnight for 18 hours. That thing bubbles like crazy (I bake that every other day now). The ratios in the No Knead Bread have even more salt than than the Croissants. I wish I could have a direct line with Alton Brown to see what his brilliant mind might say to this. I am honestly not sure.
I made it last night … it was a headache to rolling and chilling again and again but these are too good… thank you!!
love
These croissants are delicious! I added a little chocolate to the middle for a yummy treat. I’ve made them 3 time times in the last 3 weeks and I have to say my family can’t get enough! Thanks for sharing!
I just finished baking these!!! They are delicious, and I’m eager to serve them as sandwiches with French Onion soup!!
O.M.G…So i would just like to say thank you. Not just for the recipe ,but for such a perfect job with the photos and preventing me from having to read such a process in words..most recipes do not come with such perfect picture instructions and this is such a time saver for those of us that really having a hard time with written instruction.
thank you so much….
Collette
These were fantastic! Thank you for the easy to follow recipe and step by step photos. They looked beautiful and tasted wonderful.
Hi Gabi
My husband and I have made these twice now and think they are awesome! We have a vacation coming up, and were hoping to make them and freeze them before hand, and just bake them fresh the morning we plan to leave. My question is, how long will they keep in the freezer?
Thanks!
Hi Laurie!
I’d say you can freeze them for a good month. Easily. Let me know how they turn out!!
Thanks for the reply, Katja!! Good to know! Thanks!
Glad to hear, Collette! Thanks for the kind words and feedback! My great pleasure.
WOW! Never tried them with onion soup! What a clever idea! Thanks!!
the secret ingredient indeed. Chocolate in the middle. You can win over the world like that 🙂 Thanks for the reply!
Arya – true, it is a pain to roll. But I am sure it paid off. Thanks for the reply!