Panettone – Not Your Momma’s Fruitcake

Merry Christmas! This is the second time me baking the Panettone from Peter Reinhart’s The Bread Baker’s Apprentice for the BBA Challenge. I didn’t blog about it since there were some things I wanted to tweak and adapt from his original formula (that, with all respect to the man, doesn’t even come close to the quintessential Panettone Milanese). Quite a few changes. Now I know why Nicole calls the BBA Challenge a ‘challenge’…
What IS Real Panettone?
History will tell you that Panettone is typically a sweet bread associated with Christmas across several regions of the world but most notoriously known in Milan, Italy, to where its birthplace is traced. Traditionally a fluffy leavened sweet bread, panettone incorporates several different candied fruits (orange, citron peel, raisins, etc.). Even if there are quite a few commercial Panettone versions on the market only a few of them stand out and are recommended such as the Bauli, Motta or the more expensive Le Tre Marie Panettone Milanese.
Don’t cringe at the fact that it is called a fruitcake – it by far NOT the heavy, high-calorie dense stuff that your aunt from Texas continually sends you for Christmas. Panettone is a light, fluffy sweet bread that can be eaten as is, or toasted with butter, you name it. Just try it out and give it a chance. It also has a great shelve life – can stay out for a whole week without going stale (covered in a plastic bag or popped back into the box).
The Changes
Honestly, even my modded Panettone will not come close to the real Panettone but at least will gravitate (hopefully) a little more than Reinhart’s original recipe. Again, I have the highest respect to Peter and I dig his book VERY MUCH, but the Panettone formula in the book just didn’t cut it for me the first time I made it.
1. Flour type:
I used Ceresota all-purpose the first time. This time I will use King Arthur’s all purpose. Just to check an alternate flour type in hope of getting some more crumb size and moisture.
2. Baking time:
I thought 1½ hours baking at 325°F was somewhat too much and the loaf tends to dry out. So I will bake the loafs at 1 hour maximum.
3. Shape:
I am not going to make the mini loafs anymore. They tend to dry out. Even if the book states to have them in the oven for 25-35 minutes, the inside was too dry for my taste.
4. Quantities:
I added 3 egg yolks instead of 1 just to have a little more color and consistency. Also added 7 Tbs water to have a even more wet dough. I don’t care of being sticky dough as I knead it in my bread machine.
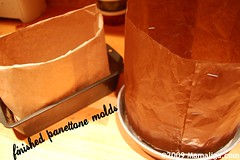
5. Panettone baking paper:
I didn’t have the heart of buying a set from Amazon for $7 plus shipping so I used some brown packing paper (or a brown paper bag) and brushed it with melted butter. Holds together extremely well and looks rustic.
6. Rising time:
Definitely NOT 2 hours as in the book. More like… 5 hours. The yeast is “shocked” my the amount of sugar and acidity from the sourdough sponge , so it need longer to recover and do it’s work. Also, I had to refrigerate the dough overnight as I had no time to finish baking it the second day.
[ad#inpost-horis]
Let’s Start
This post is already long so it is time to get going. Get your mis en place. There are three total days of preparation for this Panettone, considering that you already have the sourdough (barm) going strong. The whole process is broken down in three phases (sponge, candied fruit mix and dough preparation).
The following recipe is adapted from Peter Reinhart’s formula in the book, and it’s heavily changed and modified. If you want Peter Reinhart’s original formula, you should buy the Bread Baker’s Apprentice book – you will never regret it. It is a well written book, with great resources, not to speak of the insanely great bread recipes in it!
Day One:
The sourdough sponge:
- 1 cup (7 oz) all-purpose flour, unbleached (King Arthur’s)
- 1 cup tepid milk (not hotter than 100ºF or you’ll kill your yeast)
- 1 cup (5 oz) sourdough starter (barm)
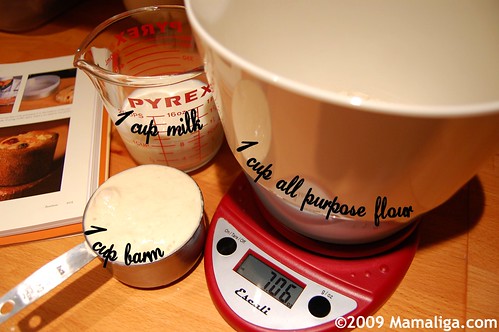
Nothing terribly complicated here. I mixed the three components together until I had a nice hydrated runny dough. Covered the bowl in plastic wrap and left it out on the fridge (that’s our hottest spot in the kitchen) until I saw surface bubbling (took about 5 hours at room temp):

Candied Orange Peel
The Candied Fruit Mix:
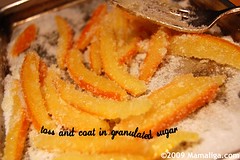
Now, I made my own candied orange peel way ahead but it can be done the first day since it will only take you 30 minutes or so. I usually leave the batch of orange peel out to dry overnight but it is not required for this recipe. You can (and should) at least get raisins and store bought candied fruit for more variety.The home-made candied orange peel is the simplest thing to make. Just cut the orange peel in julienne strips about ¼” wide, and blench (come to a boil, drain then pour in cold water) them three times to remove the bitterness. After the last drain, add ¾ cups water and 1/3 cup sugar and boil until almost all the water boiled down to a syrupy consistency (as always be careful with hot sugar syrups, their burn is just not fun):
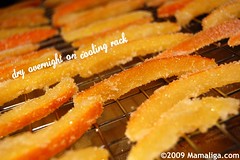
Dump the orange peels onto a tray with enough sugar to toss and coat. It is a sticky business so get ready to lick your fingers. Next, place them on a drying rack and leave them overnight to dry. After that they can be stored in a jar, and forget about them in the fridge – they can stay like that for years:


On to the candied fruit mix.
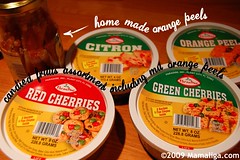
Use your taste buds here. Add or subtract quantities and candied fruit types. For instance I just can’t make peace with slivered almonds in my Panettone, so I parted without them. You like more raisins than orange peel? Double the raisin quantity! You hate raisins? Send them off to me. I’ll eat them all! You get the drift. The thing that shouldn’t be modified here is the amount of rum and extract (or your liquor or extract choice). Here I went with quite a bit of variety (except the strange red and green cherries – those were just plain strange):
Candied Fruit Mix:
- 2 cups candied fruit mix (your choice here)
- 1/3 cup rum (I used Puerto Rican Bacardi)
- 1 Tbs pure orange extract
- 1 Tbs pure vanilla extract
No big science here either. Just blend all the ingredients together in a bowl, cover in plastic and refrigerate overnight.
DELICIOUS WARNING NOTE: the mix proved to be insanely delicious. I couldn’t stop myself picking at the macerated fruit mix the next day. Most of the liquor and extract were absorbed by the candied fruit and flavors developed into this intricate fruity thing that cannot be explained. I might use this mix just as a dessert of sorts next time all by itself. Or maybe over ice cream?


So, we wrap up day one by having the sponge and fruit mix sitting in the fridge overnight. They go together well. They are friends. Good night, I am going to bed now.
Day Two:
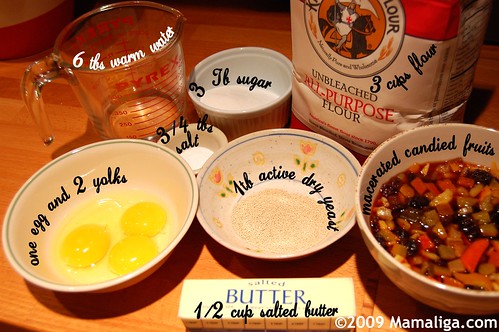
Rise and shine (and take the sponge out of the fridge. It will need 1 hour to get the chill of and to bring up to room temp)! On to the actual Panettone dough:
- 3 cups all purpose unbleached flour (King Arthur’s)
- 3 Tbs sugar (granulated)
- ¾ Ts salt
- 1 Tbs active dry yeast (I used Fleischmann’s)
- 1 large egg
- 3 large egg yolks
- 5-7 Tbs warm water
- ½ (1 stick) unsalted butter
A note on kneading: The book specifies kneading this dough by hand. Because the dough is (and should be) so wet, I knead mine in my bread maker for about 10 min straight after adding the wet components. Less mess and more clean hands! If you have a KitchenAid, the better!
There’s a half of a page on the kneading process. I bake it down to two phases:
1. Mix the dry ingredients with the eggs and the water in the mixer (or bread maker) until you form the dough ball. Let it rest for 30 minutes:

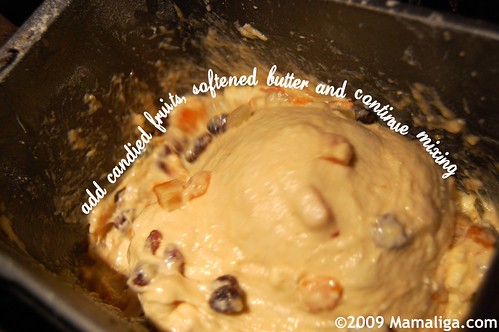
2. Add the softened butter and fruit blend and keep mixing for another 10 minutes:
That’s it. Place the dough in a bowl big enough for the dough to rise, cover it and leave it in the warmest spot in your kitchen:

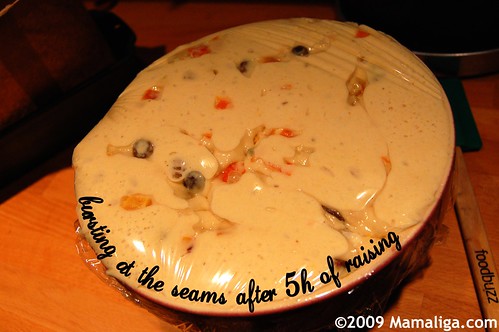
Let it rise for 5 hours. The book states 2 hours, but there’s no way the dough will increase 1½ times. The active yeast is taken by surprise by the amount of sugar and acidity (because of the sourdough), so it needs more than double the normal rise time:
After those approximately 5 hours (more or less depending on your kitchen temperature) of rising, I popped the dough in the refrigerator overnight. The book specifies baking it the second day. But I started things late the second day and I didn’t feel like baking at 12:00 am.
Day 3:
Best thing is to start in the morning to have enough time for the dough to chill off. So, I pulled my dough out of the fridge at 8:00 am and placed it in the cozy warm spot in my kitchen (above the fridge). While waiting I went on and worked on the next stage…
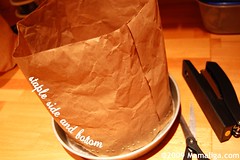
A Little Paper Crafting
I am so cheap. You can buy the fancy Panettone paper baking molds if you wish, but if you feel adventurous (and you should, like I did) you could make your own paper molds out of regular brown packing paper or brown paper bags. Here I made one (6″ diameter) and I stapled it on the sides and bottom. You could simply use several different paper bag sizes. The only important thing is to brush them with melted butter so it’ll peel off easily. The height of the mold should be enough for the dough to rise about twice its size. Place the paper molds in backing pans so they can hold their shape when you pour the panettone dough in them.


Final Proofing
Next, pour the dough into the paper molds, shake them slowly for even distribution. Considering that the panettone dough will rise about twice its size, pour just enough dough up to halfway into the molds. Cover loosely in plastic and back they go into the warmest spot in your kitchen for 2 hours:

Bake it!
Bring your oven up to 325ºF and place the panettone loafs on the middle rack (in the baking pans so you can easily slide them out). Leave them there for not longer than 1 hour. I left mine previously in for 1½ and they lost some of their moisture. You DON’T want that, as 1 hour of baking is plenty for the 6″ or 7″ diameter loaf to bake throughout without loosing moisture. After 1 hour of baking I had mine registering at 190ºF interior temperature taken with an instant read thermometer.
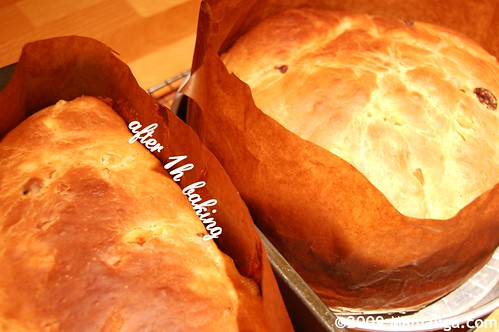
I left them on a cooling rack and waited for about 20 minutes before I tore off a big chunk as I had no patience to wait for 2 hours (at least) as the book states. Who has THAT patience anyways?!?

You can leave the Panettone in the baking paper, it will peel off easily. Once they are completely cool, you can wrap them in aluminum foil and you can leave them out on the counter at room temperature. You can toast it, or eat it as is, I myself take a big chunk every time I am in the proximity. Obviously they won’t last long at our house.
More changes next time? Cut back on eggs (stick with the one whole egg and one yolk) and double the amount of (ahem)… butter. 🙂
Merry Christmas!

Hey there, Happy Holidays!
I tried subscribing to your blog feed but keep getting a message that there is a problem with your blog code. 🙁
Hi Cynthia!
Thanks for the comment! Happy Holidays to you as well!
Just tested the blog subscription (from the little orange RSS icon in the URL bar in Firefox) and it worked. Is that how you tried to subscribe?
Thanks for the tip – I want to get things fixed.
Gabi.
Wow, good job at giving that recipe another go! I was thinking about skipping it all together since everyone was reporting such poor results. You have emboldened me to try it using your tried and true method. Thanks so much for all the helpful info and great photos!
Teri:
Thanks a lot for the comment! Glad to see the post inspired you! Cheers!
Merry Christmas, Gabi! An amazing job detailing a wonderful recipe, yet again. Thanks for sharing this with the rest of us! I wondered if you were going to re-post it, as I noticed there was some kind of glitch on the post when I first noticed it in my Reader. Anyway, all the BEST to you and your family! My Compliments of the Season and Wishes for a Healthy & Prosperous New Year 2010!
Hi Sam!!
Many thanks for the comment and wishes! Yes – at one point I hit “Publish” instead of hitting “Save Draft” – so it took some time to figure out how to un-publish it…
Many thanks for the wishes again, and you also have a great New 2010 and I raise a glass of fine Lanson Rose Champagne to you and your lovely family’s health!
Wow, you are a devoted Panetone fan. The inside looks so moist. Looks like your changes to the original recipe were a success. The photos are just wonderful.
Thanks Cindy! Not sure if I am devoted, but surely know what a good Panettone should taste like. That’s more like a curse – I am stuck with it!
La multi ani! Love your site!
Wow, this looks great- thanks for the tips! I might have to make one of my own now
I’m Italia and my family loves Panettone. I’m going to make it!
On a different note I came across your panettone recipe while I was looking for a Romanian Sarmale recipe….in particular, how to wrap them, which I found. But, how do you make the brine pickled cabbage from scratch?
I had a Romanian friend who made it using several plastic 5 gallon containers (she made several cabbages at a time) and she let them sit in the brine for days…
Friend is gone but the memory lingers. I’d like to make it. Her stuffed cabbage was superb!
Can you help me….have you already done that? If so, how can I find it?
Please respond to my E-mail since your website is new to me and I’m not sure I can find you again. Thanks,
Angela
bucatariamaniac: thanks for the wishes! Same to you!
Caroline: You will have to! It is delicious!
Angela:
Thanks for the comment! I emailed you.
Hi…!
Wow, this looks great- thanks for the tips!The photos are just wonderful.really Many thanks for the comment and wishes! good job!Thanks so much for all the helpful inf.
Gabi, very nice recipe and photos. I wanted to share with you my recipe that I developed some time ago and adjusted to get a very good panettone. I’m still stuck with the candied fruit though, coudn’t find anything high quality locally, yet.
Here’s my recipe:
Starter:
1 cup flour
1/2 cup luke warm milk
1/2 tsp dry yeast
Let ferment for 12h
Add to that:
1/2 tsp dry yest
2 cups flour
1/2 cup luke warm milk
1/2 tsp salt
2 eggs
1/2 cup unsalted butter
1/3 cups sugar
4 TBS glutten
1 tsp dough conditioner (optional)
1/2 cups raisins
1/2 cup candied fruits
2 tsp of essence of panettone (I imported this from UK, along with the panettone paper molds. Very cheap stuff)
You can also try the essence called “fiori di sicilia”, which is almost the same thing and tastes awesome, found locally on the web.
I let the dough raise for 1h, puch it down, let it raise for another hour, set it on the molds and let it raise for 2h before I bake then at 350 for 50min. Another tip is to invert the breads once you have taken then out the oven ,until they cool. This process is used commercially in Italy and keep you breads from falling or compactcing as it cools. I can send you photos of my process if you like.
I Thanks,
Nilo