Home Cured Pancetta

Pancetta or pork belly (aka bacon for us in the West), is the easiest meat that can be cured at home even without the need of a curing chamber. Inspired by Jason Molinari’s Cured Meats blog, I mustered enough courage to get this project running along with the others ones that are still sitting in the curing chamber.
What IS Pancetta?
It is basically pork belly that was cured and air-dried typically with a certain spice rub. That’s it in a nutshell. It is never smoked, as that would turn it into bacon (not as if that’s bad) but it is just not the traditional way of preparing Pancetta. It comes typically in a rolled pinwheel shape but often found (depending on the region) as a flat slab.
Pancetta is generally used as an ingredient in other foods for instance like pastas, sauces, pizza, etc. Makes a great substitute for Guanciale (hard to find but not if you make it yourself!) the main ingredient in pasta alla Carbonara or all’amatriciana.
Your Friend, The Butcher!
Ok, if you are seriously considering making Pancetta, you’ll need to start a relationship with your butcher. Seriously, a butcher who’s your friend will provide the best cuts that are not always available by the counter for everybody. It’s a precious asset!
That’s what happened to me while on my pork belly quest. I had high hopes for finding pork belly in the meat section at my local grocery store but that hope quickly disappeared – pork belly was nowhere to be found! Discouraged, I asked the butcher (convinced that his answer will be NO!) if there’s any chance they’ll get pork belly any time soon. He waived to me to come by the end of the counter and asked “How much you need?” – I said “Maybe 2 Lbs?”. He disappeared and came 5 minutes out with a beautiful piece of pork belly (with the spare ribs on still). Great score! Felt like I am purchasing a contraband item of sort.
So, since then I’ll go to him if I need certain special meat cuts for my charcuterie adventures. I love my butcher! I’ll vote for him anytime!
Let’s Cure!
I took Jason’s Pancetta formula as a reference mainly because he is showing the percentages of ingredients to the 100% of meat and fat. He is calculate all ingredients as a percentage of the meat+fat. For instance 100g meat, 100g fat, 20g salt would be:
meat + fat – 100%
Salt : 20/200 = 10%
This makes it easier to adapt all the ingredients to the weight of pork belly you happen to find.

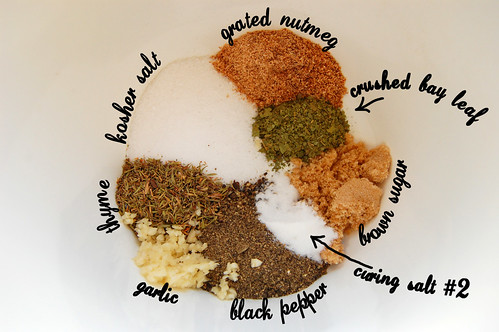
Next, I prepped my curing mix. I was missing the myrtle berries, Jason is using juniper berries instead, since they are impossible to find in the US. I might need to get them from Europe.
A note on curing salt #2 (aka Prague Powder #2). Let’s put it this way – would you risk eating cured meats with the thought that you might get botulism? I won’t, so that’s the first reason this curing salt #2 is added to the mix. It is a mix of sodium nitrate (3.63%), sodium nitrite (5.67%) and salt (90.7%), and functions mainly as an oxidizing agent making the meat safe of the evil Clostridium botulinum bacteria.
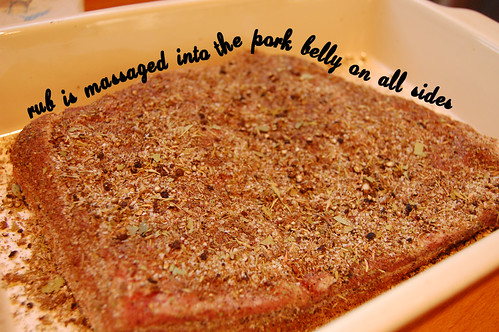
Next step is to literally massage this curing mix onto the pork belly all over so there are no exposed spots of fat, or skin, etc.
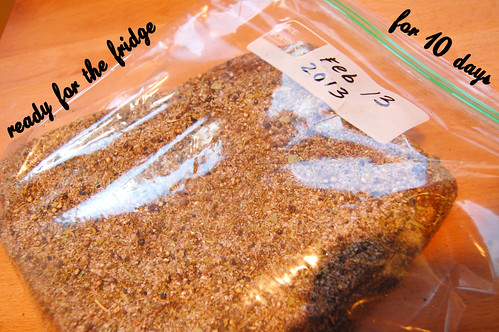
Plop it into a zip lock bag, label the date, place it in the fridge (NOT freezer!) and forget about it for 10 days. The cure mix will do its magic and the spices will impregnate the pork belly turning it into this wonderful thing! Also, the salt will pull out some of the moisture from the pork belly – it’s OK! Looks like the water content depends weather or not the meat was previously frozen. Not important – it’s brine anyway. During the 10 days make sure you turn it every now and then to evenly distribute the brine. Mine didn’t have any liquid but I still did the turns.
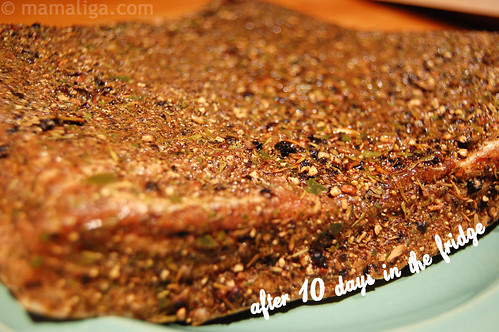
The cured pork belly which now officially can be called Pancetta emerges gloriously after the curing period ready to be rinsed, rubbed with the traditional Pancetta spice rub and hung in the curing chamber or placed on a cooling rack with a tray underneath in the fridge.
Rinsed and patted dry:

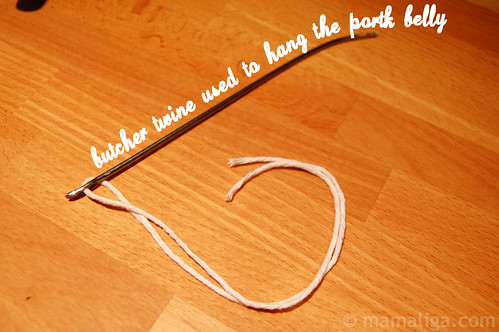
I used butcher twine to make a small loop so the Pancetta can be hanged in the curing chamber:
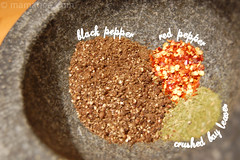
Next, I prepared the spice rub mix (black pepper, red pepper and crushed bay leaves). Tweak the mix to your tastes, varying the ingredient amounts. I used Jason’s amounts:
- five crushed bay leaves
- 2 Tsp coarsely ground black pepper
- 1/2 Tsp red pepper
I ground and mixed them all up in my trusty granite mortar and pestle. My life would be a complete misery without it.

Ok, if you got this far, it means that you are set for your charcuterie carrier (at least at home) and you’ll never need to buy any cured meats from the store!
Time for another Pork Belly Spa! Massage the spice rub into the dry-patted Pancetta. Again, try to push the rub into the surface so it sticks to it as much as possible.
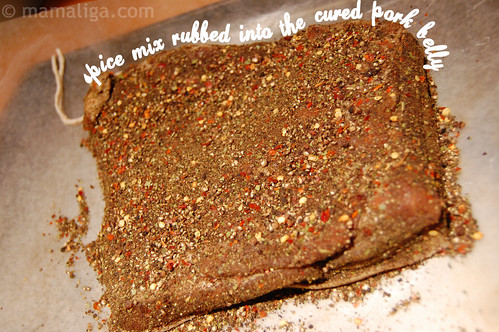
This is the part where the Pancetta goes into the curing chamber at a steady 55F degrees and 65% RH humidity for at least 2 weeks. Now, if you do not have a curing chamber yet, you can as I mentioned above place the Pancetta on a cookie rack (with a tray underneath to trap any possible drips) and into the fridge it goes for the same amount of time. You want some of those spices to penetrate the Pancetta to get the best flavor!
In the 3rd week I started getting some small moldy spots – I suspect from the MK4 mold that I sprayed the Salame di Brianza with. They were hanging in the same curing chamber with my Pancetta. I removed them with a paper towel dipped in vinegar. Problem solved.
I left mine for one month straight and here is the result:
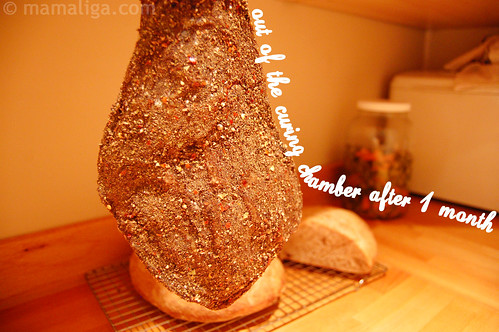
Honestly I didn’t have high hopes for it but when I cut the first slice, I couldn’t believe my eyes and tastes! It was one of the most wicked sublime Pancetta I ever tasted (not as if I tasted many, mind you but you get my drift). It had a great porky taste with herb-y overtones.

Again thanks for Jason from the Cured Meats Blog – his Pancetta adventures were of huge inspiration to get me started with my Pancetta.
Today I’ll make a genuine home made Pasta Alla Carbonara with it.

I must say, this looks fabulous…..really. If you want juniper berries, I know where to find them. Let me know if you’re interested.
I wish I lived nearby! 🙂
Thanks Scott! Coming from you, this compliment has real value – Thanks!! Sorry – I meant myrtle berries.
Thanks Cynthia! How far are you?? This is very ship-able. It is cured and ready to fly 🙂
Cheers!
Gabi.
hi,
i’m a baking enthusiasts from China.
I like your website very much:)
so,can i translate your articles in my blog http://www.yzdiy.com and use your picture?
I want to introduce them to more friends in China.
I will credit all the recipes with your original post URL so that they know of the source.
Looking forward to your reply.
Thx~~
Hi, do you know where I can get curing salt mixtures that use sea salt or other natural salts? In my search the curing mixtures just list “salt” as an ingredient but they don’t say what kind of salt. Any ideas? Thanks, btw you posts are very informative! Thanks for sharing.
Thanks Valerie – Hmm… not a clue. Might be an idea to contact the sources directly. I suspect they use natural salts since there’s no point in using the other kind, which is iodized table salt. Just a thought.
Hi…
i read your post.. nice post..it is!I must say, this looks fabulous…..really. Thanks for sharing it.
for curing whole muscles, you don’t actually have to use curing salt. Botulism require an anaerobic environment to develop which is not usually possible with a whole, intact muscle. Fermented sausages are definitely susceptible to botulism which is why they are always made with curing salt. Prosciutto is traditionally cured without any nitrates/nitrites and is a safe product. Now the curing salt does give the preserve the red color of meat and firms the meat, both of which may be desirable depending on what you are curing.
You inspired me to try my own pancetta! Into day 5 in the curing process with 5 to go. Problem is … only have refridgerator to continue curring in 🙁 Is that a problem? Will my fridge be ok ??? How long shall I leave it in there? thanks! Anxious to see finished product 🙂
Superbly prepared article….the photos are tops and the process clearly described without BS…..thankyou from Geoff Swain.
Pretty much followed the instructions to a “T”. I Cured it for 11 days as I did not feel it was firm enough. I rinsed it , then soaked it for 3 hours. My experiance with bacon and lox recipies have got me into this because of the final product being to salty. Hung in garage for a month. The garage was well insulated and with cold temperatures it probably stayed aroud 55. Checked it from time to time , smelled great and no sign of mold. Just sliced off a piece and fried it up. Perfect! Thanks
Very Lovely,Now the silly question, on cooking out the fat, it reaches all expectations, being easy digestible.
But eaten ” Raw ” as thinly sliced Anti-pasta, we find is Tough, and hard to chew.
Question is, Is it this could be left for longer than 23 day as it is just now, it will get tender with age, akin to Dry cured Ham as an Hog’s rear leg, when aged appears to melt in the mouth, especially if is over a year hanging. So in your opinion, is it unlikely to be served as an anti -paster
Colin Clive.
I tried to replicate this recipe to perfection. However after a month I got something that looked like your picture, but smelled and tasted like dried raw meat. As a fellow romanian, I have a decent feel for what this should taste like, and honestly it was WAYYYY off.
I’m completely dejected and depressed 🙁
Andrew – sorry to hear that! Hmm – something wend wrong. Did you have the right salts?
It might need to be left indeed longer. But my impression is that it needs to be sliced really thin and in small bites. And pancetta is typically used more for cooking than for anti pasta.
Thanks Gabi, but who are you referring to,( as two different inquires here ) if it’s me Colin Clive, Ill except age might make it tender, but slicing it realigh thin, is as it suggest age, before thin. suppose looking for a combination of both, the product is 34 % lighter in weight at 13 weeks drying time, so I then actually went out and bought some that suggest Palmer ham, that mine is in comparison to texture on the chew. In any event I hung it again for further period of time say 6 months, and will recalled the weight loss, But hey Good result considering my first attempt. Cheersa Colin clive.
Hi Gabi,
You’ve inspired me to make my own pancetta (and now I’m thinking about bacon, dried sausages and who knows what else!). Thank you for that. 🙂
One thing I thought I should point out is that on Wikipedia, it says never to use curing salt #2 for anything your going to cook at a high temperature (such as bacon) because it forms nitrosamines which are carcinogenic. Instead, it’s recommended to use curing salt #1 (prague powder #1). Here’s the link to the ariticle: http://en.wikipedia.org/wiki/Sausage_making
Anyway, thank you again and I’m very much looking forward to my pancetta being ready! Can’t wait!
Hi Geoff!
Glad to hear that although I am not sure of it myself now. I didn’t cure since 2011 so I am a little rusty. But one of the reasons I stopped curing was the issues you are mentioning. I thought I’ve been there, done that and that’s about it. I am sure folks from forum.sausagemaking.org/ could elaborate on this.
But it is worth trying this once at least. Good luck and let me know hoe it turns out!!
Hi again Gabi!
Thanks for the reply. I’ll look into sausagemaking.org, especially since I’m thinking about taking a stab at that next. I live in Hawaii where our weather rarely gets down to 55 degrees (yes, life here is rough) and don’t have a curing chamber, so I have to dry the pancetta in the fridge. So, today I took it out of the ziplock and have it on a rack and, hopefully in 2 – 3 weeks, I’ll have something resembling your pictures. I’ll write back when it’s all done and let you know how it came out. Thanks again Gabi!
Hi again Gabi,
I just wanted to let you know that my pancetta turned out simply wonderful! Amazing flavor, just a bit too salty because I eyeballed everything except the pink salt (I just ordered a kitchen scale so that next time I can actually measure it all out properly).
Also, just on a side note, I made cured salmon (lox aka gravlax) which is super easy and very tasty and have just started my first batch of sauerkraut.
Anyway, it all started here with your pancetta and I owe you big thank you for helping me get started on what is quickly turning into a new full-blown hobby for me. 🙂
Mahalo,
Geoff
Geoff – Thanks for the comment! I am so glad it turned out well! Whoa! cured salmon?? I always wanted to try that. Do you have a good recipe? You inspired me. I will have to make another batch of pancetta. So glad my humble post was of any use for you! Enjoy the pancetta and keep in touch!
cheers!
Hi Gabi,
The salmon came out great and was incredibly easy! I can’t remember exactly which recipe I used (and I actually combined a few), but here’s the main one I followed:
http://userealbutter.com/2013/09/02/homemade-salmon-lox-recipe/
After that, I just went through a few other recipes and kind of mixed and matched some of the herbs/spices. I think it’s honestly pretty hard to screw up. 🙂
Also, just started my next round of pancetta and fresh bacon yesterday. I recently bought Ruhlman’s book Charcuterie and Sandor Katz’s Wild Fermentation. I’m getting into all kinds of new fun stuff.
Thanks again Gabi for getting me started on all of this. (^^)
– Geoff
I have tried curing pork tenderloins and pork shoulder. Taste was great color and flavor. But damn it was too salty even for me
I have been covering with #2 kosher salt and seasoning heavily
Everything looks good after I wash it off but man is it salty
Any suggestions
Thanks
Dennis Lynch
Hi, Nice end result. But where you got the idea of adding sugar? I understand spices, everyone’s preferences, but sugar? Now, brown sugar brigs up the flavor and is used on smoking meets, but making pancetta?
I am writing because I just retuned from Rome and as we all know they only use plain salt and maybe bay leaves. Period.
Just curios
thanks
for you-re blog.
E ok as folosesc instacure 1 (Prague pink salt) is Nu saltpetre, instacure 2 care e cancernigena din cate am afloat?