Salame di Brianza

I agree, lately my blog’s flavor leans on the meaty side (sorry vegetarians). This all has to do with my latest fascination with cured meats, and the craft of Charcuterie I consider an art in itself. After some (failed) attempts at curing sausage, some of which grew beards (literally), I finally got a grip on some of the key rules, so here is the the first successful result – Salame di Brianza!
A Porky Mix!
This one was the result of another inspiration from Jason’s Cured Meats blog, using his recipe for Salame di Brianza as a guide. The pork butt was on sale that week at our favorite grocery store so the stars were aligned to get cranking. The Salame di Brianza is typically produced in the region of Milan (Lecco and Como) and it is listed as a DOP product (Denominazione di Origine Protetta, the Italian equivalent of Protected Designation of Origin). A very simple salami with a very delicate porky flavor and only a few seasonings (salt, pepper and garlic). Traditionally the pigs used for this salami must come from the Emilia Romagna, Lombardy and Piedmont region, but mine will come from the grocery store down the road (sigh). Obviously my salami would fail the DOP testers but didn’t fail my taste buds – I like my taste buds, they are nice buddies!
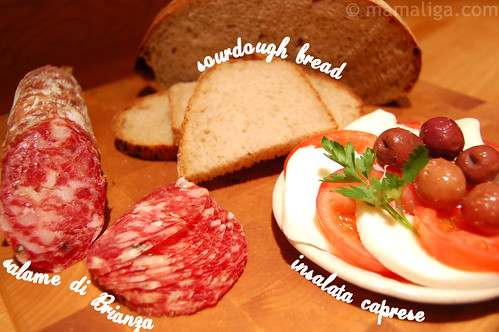
It makes sublime additions to antipasti (appetizers), bruschetta, and it makes out-of-control sourdough sandwiches!
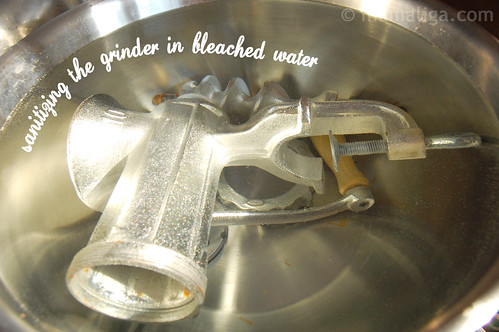
Stay Clean!
I keep reading that the main ingredient in sausage making is cleanliness and having everything that comes in contact with the meat sterilized. I immersed all my tools into a stainless steel bowl filled with bleached water for about 30 minutes. I used 1 Tbs bleach to one gallon of water:
Chill!
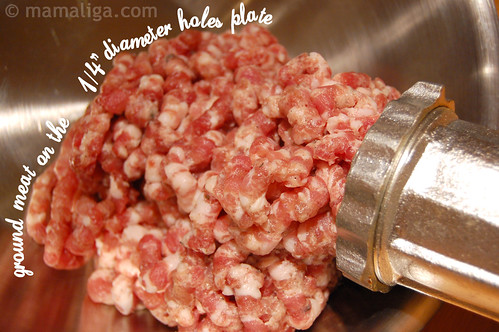
Another important thing in sausage making is to chill the grinder (and meat) before grinding to have a nice even grind. The grinder cuts more easily through a chilled, and somewhat solid chunk of meat than through a soft one.
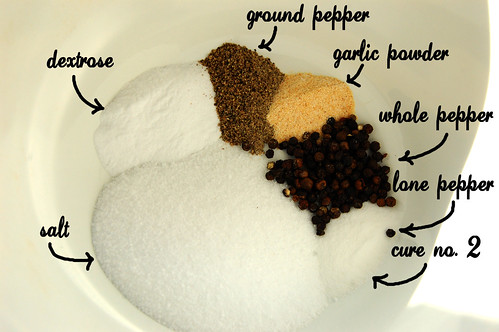
The Spices
Preparing the spices is what I enjoy most in sausage making. Maybe because it is a pretty smelly process and I get to use one of my favorite tools in the kitchen – the granite mortar and pestle. This is what goes into the mix:
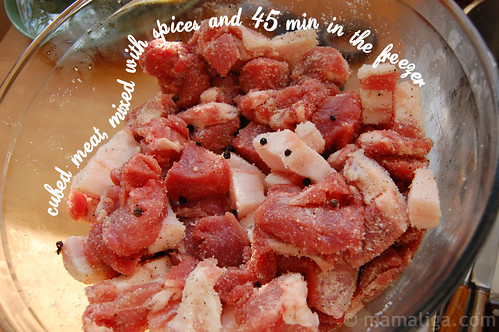
Next, I poured the mix over the cubed meat (70% butt and 30% pork belly), roughly mixing it throughout, then laid it out on a aluminum tray, covered with plastic wrap, then in the freeze it went for about 45 minutes:
Then passed it through the chilled hand-cranked meat grinder, using the .25″ diameter holes plate:
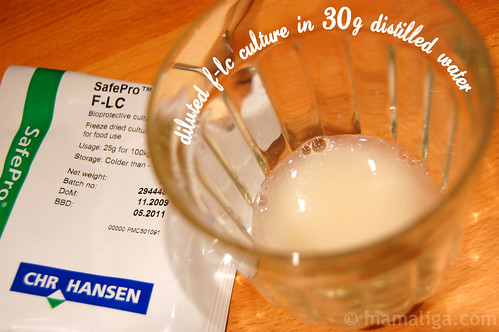
Next I had the F-LC culture going by dissolving it in distilled water at room temperature. This culture is traditionally used in fermented and air dried sausages or salamis. The culture has a bio protective property controlling and keeping harmful Listeria monocytogenes at safe levels by producing certain antibiotics like bavaricin and pediocin. The F-LC culture will produce acidification at lower incubation temperatures (<75º F) with a flavor traditionally found in European style cured meats (slower fermentation):
Next phase was the stuffing of the 60 mm diameter Collagen casing soaked in warm water for about 30 minutes. Didn’t take any pictures since my hands were meaty and I didn’t want to touch anything else, specially my trusty Canon D40! It was a cumbersome process since I had to do this by hand as I don’t YET have a nice sausage stuffer like this one. But one day, I’m telling you… I had to pack the meat very tight and try to eliminate EVERY air pocket to have a nice even texture in the end. Air pockets are perfect environments for spoilage and oxidation. I kept adding meatballs in the casing then squeezing and pricking every air bubble. Not fun, but in the end my hard labor was rewarded and I had a nicely packed firm salami (it was very bouncy too):

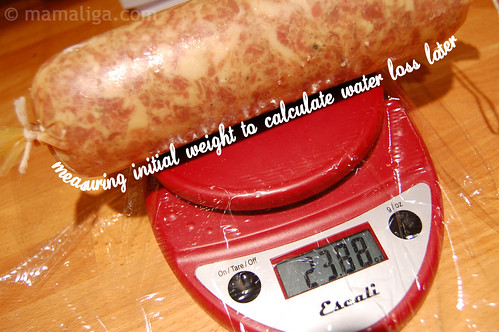
Following, I measured each salami’s initial weight to compare with the final weight and calculate the water loss over the drying period. A well dried salami will loose something around 35-40% of its water in about 2 months if kept in the right environment:
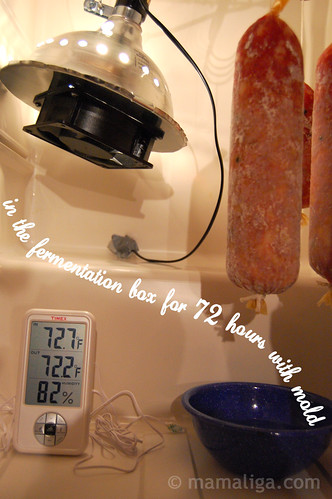
I sprayed them with the Bactoferm 600 mold (aka M-EK-4 mold) that will give the traditional creamy white surface appearance you find on store bought salamis. It is basically a culture containing Penicillium nalgiovense that will help controlling the casing’s surface flora by suppressing the colonization of yeasts, other organisms and bacteria. I dissolved the mold powder in room temperature distilled water (30 g) and let it bloom for a couple of hours. I added this to approximately 300 g distilled water and sprayed the salamis before they went into the fermentation box.

Here, they spent a cozy 72 hour stay at a 72°F and 80% RH (humidity) until they started forming a nice layer of mold on the surface. During this time I sprayed them twice more to encourage the mold forming:
Here is a close-up of the mold after the 72 hours and right before they went into the curing chamber:

And here, they emerge gloriously after spending about 2-1/2 months in the curing chamber at 55°F and 70% RH having lost about 40% of their water:

I was VERY happy about the result! My Salame di Brianza had a very nice fat distribution, pink-ish color and packed, firm texture. I only had one air pocket in one of them (no spoilage whatsoever):

The taste was sublime, to say the least – porky, with a slight peppery and garlicky overtone. It made wicked antipasti and sandwiches:
This recipe will definitely be repeated once I clear my curing chamber of the existent Gyulai (smoked Hungarian sausage) and the Spanish Chorizo that’s nicely drying in there.

Wow…that’s impressive! An investment of patience, time and effort but great result.
Thanks Joan! It was a great result – but it is gone already! Need to make another batch… Thanks for the comment!
Looks amazing!
That salami looks amazing. It’s just about my favorite sandwich meat, although difficult to get her in Bangkok compared to in the US.
Wow! That’s some of the best looking salami I think I’ve ever seen. If it tasted half as good as it looks, it must have been a great treat!
It sure did. Honestly – for a first, it was a dang awesome tasting salami.
Jason – thanks a TON! It all began with your wonderful blog!!!
felicitari,ti-a iesit un salam de zile mari!iar post-ul e fantastic,nu deschizi o fabricuta?
Alison – Multumesc. Insa daca devine business, hobbi-ul isi va pierde farmecul. Devine stres.
Here is a bucketful of Kudos for you – you always learn to know how to make things!
Thank you!!! Glad to see you around! Will need to pick up one of these days from where we’ve left it…
Looks wonderful! I’m just wondering, how did you create a fermentation and curing chamber? Is that hard? I’d love to get into sausage making, but I have no idea where I should cure them.
Great site, What are the measurements of the hers and spices used?
Salut Gabi ! Arata superb…..la gust nu vreau sa ma gandesc ca i-mi lasa gura apa… si mie i-mi place sa ma “ung ” pe degete…Felicitari ! Am o singura intrebare cu privire la MOLD 600 ,de unde as putea sa cumpar si eu produsul ? Am chiar acum “pe rol” un amestec vita-porc……Multumesc.
Hi Stelian and thanks for the comments! I bought it from Butcher & Packer here. You can find many other meat curing stuff from there. Multumesc de comment!!
La multi ani Gabi si felicitari!Am ramas mut cand ti/am vazut blogul tau,si eu sunt pasionat de bucatarie si cearcuterie,chiar am incercat si eu sa fac carnati crud uscati dar am cam dat gres ,mai ales ca nu am avut cultura starter,nitriti si camera de maturare cu temperatura si umiditate constanta.cultura de penicilina am luat/o de pe membrana unor carnati deja facuti,chiar a mers dar lipsa camerei si/a spus cuvantul.
Am incercat sa cumpar de pe site/ul pe care l/ai afisat aceste ingrediente dar pentru a le aduce in europa sunt niste taxe de ma doare capul,cunosti vreo firma de prin europa sau din romania care comercializeaza asa ceva,sau vreo alta metoda de a le procura mai ieftin?
Bafta in continuare si iti voi urmari articolele tale!