Charcuterie – Fermentation and Curing Chamber

Ok, I have to tell you about my latest bug. Growing up in Eastern Europe where EVERYTHING is cured, smoked, with prosciutto and sausages hanging in the pantry, I couldn’t help but try to reproduce the same delicacies here on US soil.
But I was faced with a couple obstacles like I had to keep my basement smell free, and keep my neighbors happy if I was to build a smoke house to cold smoke the meat outside for 10+ hours.
Here’s the first task for my charcuterie adventures in curing meat – the fermentation and curing chamber.
What is Meat Curing??
Without going into much detail and chemistry, (if you wish, you can read Wikipedia’s entry on curing meats) curing is the process of preserving and flavoring (sometimes cold smoking) using salts, sugars, nitrites, nitrates and/or a combination of these. It’s being done since time began and it became a craft in itself called gracefully by the French – charcuterie.
A Word Of Caution
Curing meat involves of course raw meat handling, which can become (if not careful) a source of all sorts of disease, not to speak about contaminated meat, etc. I cannot stress enough the need of proper sanitation, both, of your precious hands and the tools that get in touch with the raw meat. I will most likely write a whole post dedicated solely to safety on meat handling, since it is the most important ingredient of the charcuterie. You’ve been warned!
The Fermentation & Curing Chamber
 Since a major part of curing the meat is forming an environment with a stable temperature and humidity, I had to adapt to my current habitat. We have a basement used for all sorts of other things like laundry, music room, guitar amp building, junk storage, and so forth. The basement temperature unfortunately varies depending on the season sometimes falling even down to 53F degrees on our “happy” Chicago winter days with a humidity of 40%, making it a hostile habitat for curing meat, that get very fussy easily and need a constant 70F and 80% RH for the fermentation process and a 55F and 65% RH for the curing process.

Most of the inspiration to build a curing chamber came from Jason’s blog over at Cured Meats, who details his version of forming this controllable temperature and humidity environment using an old fridge. How clever! In my posts I will be referring a lot to his blog since a lot of my cured meats were made after his recipe formulas. My only twist on his curing chamber is that I am using mine as a fermentation chamber as well for the initial 48-70 hours at 70F of culture starter incubation (fermentation) needed.
Jason is using a separate box for the fermentation process since his curing chamber is already occupied with the longer, curing stage. I will probably be doing the same thing once I have a couple recipes going.
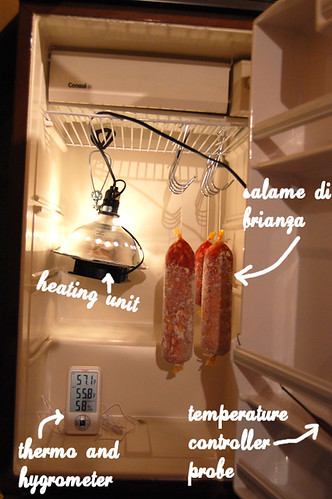
Simple as that! You can see on the photo on the right my curing chamber in its fermentation setup where the salami rests happily.
Yes, there is some investment in this hopefully successful hobby. One can of course splurge on the most expensive devices needed, and have everything top notch but I find a certain satisfaction in spending as less as possible and using, re-using or adapting items I already have laying around like this lovely dorm size fridge I never used in the basement.
Temperature Control
This is possibly one of the most important functionality of your curing chamber so you will need to buy a Line Voltage Thermostat with a remote probe that goes into your fridge. This way you’ll bypass the fridge thermostat controller that doesn’t go higher than I think 30-40F degrees which is to cold for curing.
More than likely I’ll end up having a separate fermentation box (with its own thermostat) like Jason when I start working in batches but for now, (since for my first try I used my curing chamber as a fermentation box), I’m using a thermostat that can control cooling as well as heat. Here’s why:
During winter when my basement’s temperature falls to about 53F degrees on the worst Chicago winter days, I need to boost the temperature in my chamber, specially during the fermentation stage where 70F degrees is needed using a light fixture unit turned into a heating unit. In that case I switch the thermostat to control heat so the heat would not go higher than I set it.
During summer, when the basement temperature can reach 68-70F degrees and I need my chamber to be at say 55F degrees for the curing process, I will switch my thermostat to control cold, and in that case the fridge will kick in bringing the temperature down to where it is needed.
Here I bought a Johnson Controls Line Voltage Heat (OR Cooling) Thermostat from McMasterCarr (part# 1846K26) and mount it on the wall, connected to its own dedicated wall outlet where my fridge (or heating element is connected to. Now, since this setup requires some electrical experience, I don’t recommend doing it unless you KNOW WHAT YOU ARE DOING! It is not an easy setup and some electrical design is required. I’d be glad to provide the hookup diagram for those who want to replicate this but please do not keep me responsible for anything wrong might happen! You are on your own.
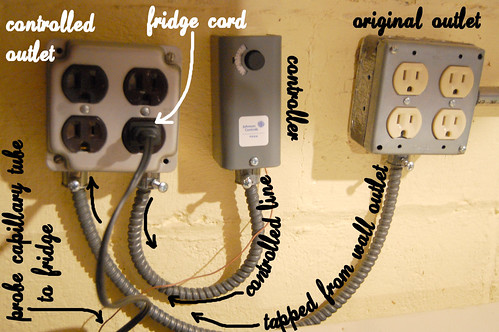

A much simpler way of doing this is of course using a cooling-only thermostat such as the Freezer Temperature Controller that plugs into the wall outlet and the fridge cord goes into it. You set your target temperature and you are ready to cure! Note that this thermostat doesn’t work for heating – it is only built to control cooling – that is if the temperature climbs, the thermostat will turn on your fridge, bringing the temperature down to the desired target temperature (ideally at 55F degrees for curing).
Now, of course if you have a house with an underground cellar or a pantry that has a steady 55F degrees and a humidity of 65% RH, consider yourself one of the lucky ones that will not need a curing chamber!
The Heating Unit
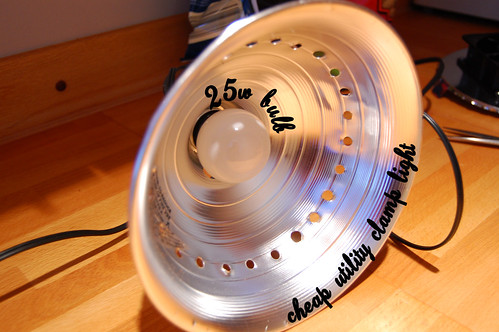
This is again inspired of Jason’s Fermentation Box contraption where he is using a bulb as a heat source and circulating air with a fan. Here I bought a cheap Utility Clamp Light and used a small 25w bulb as a heating source. Later I would probably switch over to a heat source other than light as light apparently is known to degrade fat:
Next, I went to my hardware store and bought a piece of duct sheet that I cut out a piece to fit the open surface of the utility lamp as a lid with four tabs that will hold this in place. I measure the fan mounting screws and then drilled a bunch of holes for the air circulation once the fan is on. I did the same in the lamp aluminum cover:
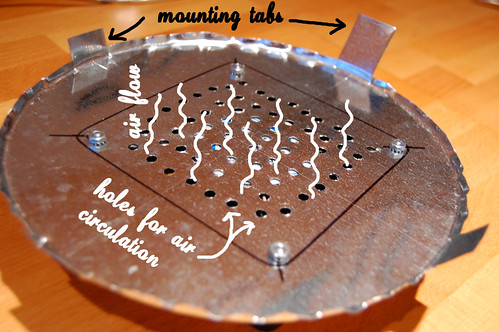
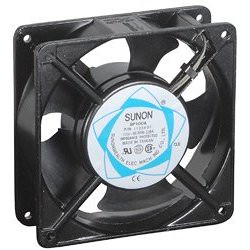
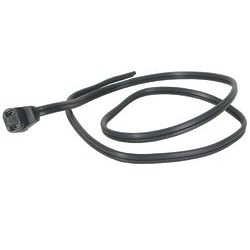
I bought a 115 VAC fan (4-5/8″ by 4-5/8″ and a angled plug fan cord that I soldered to the utility lamp socket so the two are activated together and connected to the same outlet cord:
This is the fan I got – it is usable with wall voltage (115 VAC), and the angled cord that goes with it:
And this is the fan mounted to the utility light lid using four screws:

I still need to read up on the effect of light on the growing cultures used in the salamis, etc., but this makes up for a cheap way for getting the right incubation temperature your fermentation box.
Humidity Control
The second important functionality of the curing chamber is humidity. The curing process needs a 65-70% RH, for a slow steady drying. If the salami or sausage cures in a drier environment, there’s the risk of having the surface drying before the humidity escapes from within, trapping it inside.
One would usually use a humidifier inside the curing chamber plugged into a hygrostat from where you set the desired target humidity (80% for fermentation and 65-70% RH for the curing process). Since I didn’t get to buy a humidifier and a hygrostat (that controls the humidifier) yet, I am using a bowl with water to which I added salt as a humidity source. This keeps my humidity up to where is needed, although it is not as easy to control as with a humidifier.

I will probably end up buying them later on but for now the lovely blue bowl with the saline solution does great. I am eying the Eva-Mist edv-2500i Ultra Sonic Humidifier, because it has an in-built Digital Humidistat so I won’t need to buy that separately. And hey, it even has a 7 colors nightlight – just in case my salamis get lonely and have hard time sleeping!
As I mentioned I’ll probably have a separate box for the fermentation process once I have the lovely meats curing in the curing chamber but for now this is how I have my fermentation/curing setup.
A little update:
Right now I have my salamis hanging in the curing chamber (see image above) but the thing I am battling is in fact bringing the humidity down within the 65-70% RH since the meat has high humidity content still, and once I close the fridge door, the humidity spikes to 80%. Not bad, but a little too high for curing.
I do crack the door on my fridge every now and then to get some of the moisture out, but then the humidity falls down to 55% RH.
This will probably change later in the curing process, once the meat lost most of its moisture – the culprit for the humidity spike. I will have to write about this in a later post since this one is ALREADY too long.
Stay tuned, make sure you subscribe to hear news of my adventures in charcuterie!

Have you tried a Ceramic Heat Emitter instead of the light bulb? They come in different wattage, and make no light. They also screw in just like a light bulb.
google “Ceramic Heat Emitte”
Nice write up, Thanks
I wanted to, and at the time i wasn’t able to find it online. thanks for the tip!!
So where can I get Ceramic Heat Emitte? Does any one recommend a site?
I have an old manual defrost upright freezer. (metal shelves and tubing). Can I use this freezer for a conversion to a curing chamber? If yes, how do I remove the shelves etc. without damaging the cooling system?
Thank you
George
Consider adding a fan to remove the air if the humidity increases above a certain threshold. I’ve built a kegerator with a similar concept however with no humidity control. I imagine it will not be difficult to set up with an accurate humidity controller.