Pasta Basta (or home made pasta)
No, that’s not a name of an obscure pasta dish, or anything near – just the title for my blog post on how to make pasta from scratch.

I enjoy cooking with store bought pasta (Barilla) but for certain dishes I like having home made fresh pasta (Pasta Fresca), since it adds a whole new dimension to the equation.
The Pasta Recipe (updated!)
Dear Mamaliga fans! I just realized (at some of your comments) that I was so busy explaining the pasta making procedure that I completely forgot the pasta recipe! My apologies and here it is for a batch that can fee say 4 people:
- 5 cups pastry flour (low-gluten or tipo 00)
- 6 extra large eggs
Sometimes if I want a more richer (and more yellow) pasta, I use 12 egg yolks instead of the 6 whole eggs.
The Egg, Then The Pasta!
Besides the fact that home made fresh pasta has a distinct flavor, texture and richness, it also looks gorgeous on a plate, depending on how many eggs — and more importantly, what kind of eggs you use.
I keep dreaming about having a small flock of chickens in my Chicago NW suburban backyard (as I had back in Romania), but until the “Live Off Your Land” bill passes the House, I will have to be happy with the most cage-free, free-range, natural, brown eggs I could find on the market (sigh).
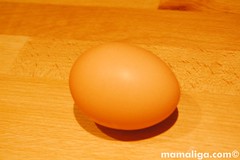


If you get a chance to lay your hands on some fresh farm eggs from your local farmer, chances are that you might be preparing a 5 star fresh pasta next. Read on.
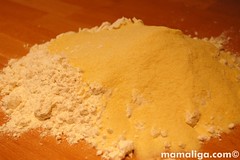
Flour Types
While all-purpose dominates as the flour of choice for fresh pasta don’t be afraid to experiment with different types, like semolina flour for instance. It adds a nice surface roughness which sauce sticks to well, etc. Here I am using approximately half and half (all-purpose and Semolina flour). Usually mix the two together before adding the eggs.
Update: also try using low-gluten flour (aka pastry flour or the Italian tipo 00), it will have a finer texture and will be easier to roll since you won’t battle with the gluten elasticity, that makes a rubbery dough.
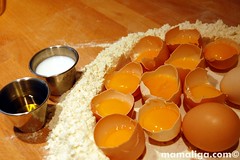
The Volcano’s Crater
As I am writing (and as you read), there are numerous Mammas (and Papas) in rural Italy that are preparing pasta using this very ancient method and one of the best “food processors” available – their hands.
[ad#468×60]
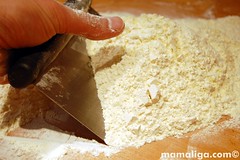
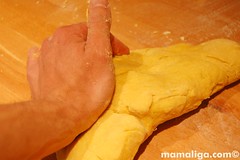
They gather the flour into a mound, then form a “crater” in the middle with a wall high enough that will keep the eggs inside, and start mixing the eggs with the flour, little by little until the dough becomes elastic enough to knead.
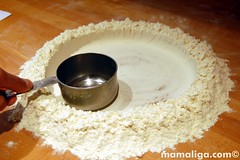
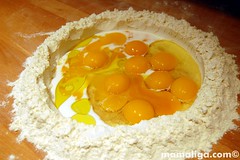
Now, there’s some skill required to mix the eggs with the flour without having eggs spill all over your counter and floor. Some tips that worked for me were to make a large enough crater to hold the eggs (I use the measuring cup in a circular motion to form my crater), mixing continuously in a circular motion and incorporating very small amounts of flour every now and then. The main thing here is to not hurry, but keep mixing, mixing and mixing…
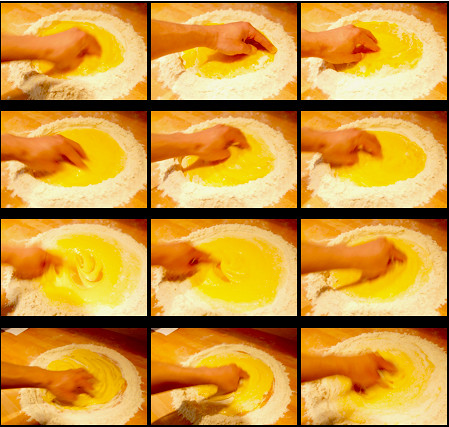
until you are ready to knead. Then keep kneading for approximately 20 minutes for a smooth and elastic texture that resemble Play-Doh consistency.
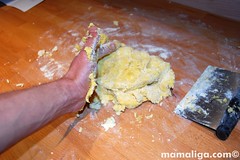
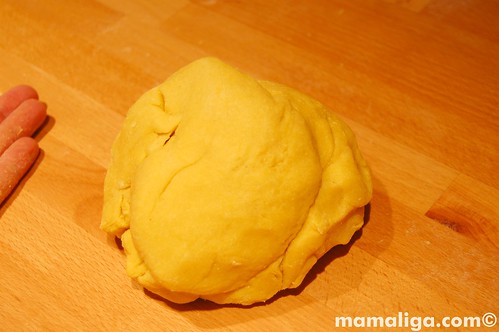
At this point divide the dough in four quarters and cover it with a bowl (or plastic wrap) – otherwise it’ll dry out pretty fast.
The Pasta Machine
At this point if you don’t already own a pasta machine, it is probably a good time to invest in one. And, please don’t be cheap – it will be a lifetime investment so be sure it is one of good quality – and preferably made in Italy, like the well known, world class Stainless Steel Atlas Original Italian Pasta Machine.
Besides the fact that it is found in many Italian kitchens, it is durable (regardless of the Italian Fiat jokes), and you can use it for the most creative pastas like linguine, fettuccine, ravioli, etc. — not to mention that you can purchase extra attachments to it that give even more flexibility in using it.
One very important fact about pasta machines is to not wash it. Just dust it off and store it in a plastic bag. It is flour after all that you’re working with.
Fold ‘n’ Roll
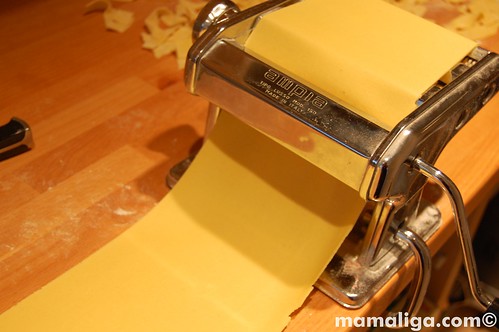
Of course, a nice result depends on the pasta ingredients, consistency but also texture. And that depends on kneading and rolling. Now, since I don’t have the time and patience of the Italian Mammas to do that by hand, I simply use the pasta machine to do it instead, by rolling a chunk of dough (usually a quarter of the whole amount) between the two smooth rollers on setting #1 about 7 to 10 times until the dough becomes elastic with a nice smooth surface.
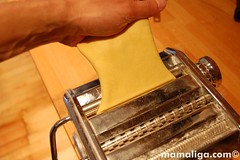
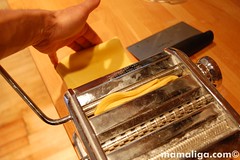
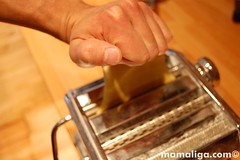
After each pass, I fold the pasta sheet lengthwise so I can preserve a nice smooth edge as it goes through the machine. You can lightly flour the pasta before every initial pass, and press it down to about 1/2″ thick with your palms – this will help rolling it. It takes a little practice but in the end you will figure it out. You will notice that with each pass, the dough becomes smoother, shinier and more elastic as you work up the gluten mesh in it.
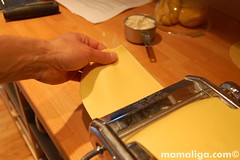
Next, it is time to roll the pasta sheet through each higher number setting until you get the desired thickness. I usually stop at #5 getting getting a 1/16″ thick sheet, excellent for making ravioli, or any kind of filled pasta, lasagna, etc. Also the #5 thickness adds a nice al-dente bite to it.
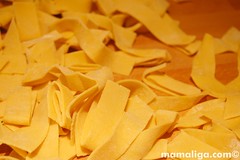
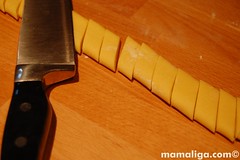
Shapes and Patterns
From here, your imagination is the limit to what shapes, cuts, or patterns you want the pasta sheet formed into. Here, I made Pappardelle which is traditionally a pasta ribbon with an approximate 1″ wide cut. I used a pizza cutter in this case.

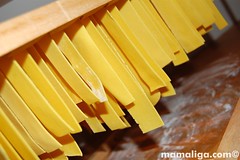
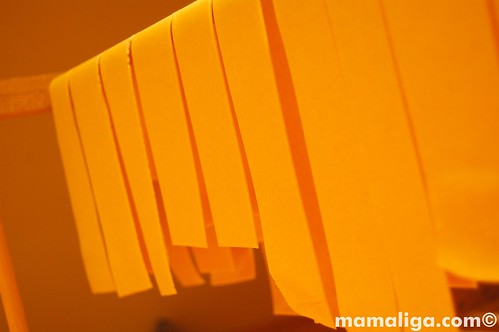
A Word On Drying and Storing
As I was remodeling our kitchen I came across our old plate rack I made a while ago. I was ready to toss it when I realized that it can be turned into a really nice pasta dryer! Of course you can purchase a more elegant pasta drying rack, or simply dust the fresh pasta with flour and form it into little “bird’s nest” mounds on the counter.


If you don’t boil it all for dinner that night, you can store your dried pasta just like any other dry pasta – in a cool dry spot. I pack them in brown paper bags and label the date and type of pasta on it.

Lori – yes you need to boil the pasta even if it is fresh before making Lasagna with it. Boil it just like regular pasta al dente then as you take them out sheet by sheet from the water (I boil about 2 sheet at a time so I won’t crowd the pot), you let them drain on a cooling rack or something a little then start layering the lasagna in the pan.
Hope it helps!
Gabi.
Gabi,
Thank you for this blog! I recently started making my own marinara sauce (I grow my own tomatoes year round down here in South Florida) and it’s great but the store bought pasta just never measures up so I was thinking of trying to make my own. With your helpful tips and great photos, I’m going to give it a try today. Thanks again, Gabi!
My husband has been making pasta using the maker, but I find that it is tough and takes for ever to cook.. not the tender, velvety noodles that one expects!! any suggests!
The noodles we have been making take forever to cook and are not tender or velvety, any suggestions
Walter, mine does the same thing. It curls and cracks while drying.
Love this post, very informative and great detail about the pasta making process. Being able to create pasta from scratch is such a great skill to have even with all the automatic machines out there today.
Rose – I found that the best thing is to cook it the same day. Dry the leftover, then pack it in paper bags and store it in the fridge (not freezer!).
I tried pasta the weekend. It was tough. what did I do worng?
sorry to hear that, Linda. Your dough might have been too stiff. The consistency should be that of a soft play-dough.
Gabi-
You are right- I used a Food Processor *(I know…I was trying a “short cut” ) I think it was too much flour. It was so firm. I don’t have a pasta machine so I rolled by hand. so difficult! I will do it as pictured and let you know! 😉
My nan is Italian and i’ve watched her make pasta so many times. I never thought to take pictures in all it’s delicious stages. Good pictures 🙂 and she’s never used a rolling machine,since she was about 14 she started using her hands. I love her dishes! But your pasta looks delicious! 😉 must try it when i get home 😀
Thanks for the comment, Beckie! I wish I could be an apprentice to your Nan! let me know how it turned out when you tried it!
Hello Gabi!
I stumbled upon your site looking for a good pasta recipe. Like Beckiee, I too watched my nana make Italian dishes from scratch. I have mastered (tongue-in-cheek) the art of pizza making from scratch (I even enjoy using only tomatoes and my own dough recipe but I buy my mozzarella&oil-I’m not a purist). A little about me, I worked in Ukraine for 7 years and one of my helpers was a Romanian gypsy but he never taught me too much Romanian (unfortunately). In any case, thanks for your excellent description, I can’t wait to try it & taste it!
Glen (PS Don’t know if you like the White Sox but you guys got some of our awesome Red Sox players, for which I’m jealous, especially Youk!)…
Hi Glen! Thanks much for the comment! Hah – not much of a baseball fan (ahem) – I know I am not a proud Chicagoan, hehe. Wow in Ukrane for 7 years?? Have you visited Romania?
Please let me know what you think of the pasta if you make it from scratch. If you master pizza from scratch, you can surely make pasta too. Good luck!
Now i know how 2 make pasta
you sure do!
Now how about a pasta red gravy
recipe
Phyl