Roll Your Kaiser

Look, this is not the healthiest breads of all, but sure makes a killer sandwich. Also thought it was time to dust off my Bread Baker’s Apprentice book and take on a new bread baking challenge. Summer is slowly tapering off with scattered bearable temperatures when I can finally heat up my oven to 425 without roasting everyone in the house. Who would have thought that this Kaiser roll bread would bring flashbacks of my childhood in Romania! I remember risking being late at our chemistry class (no one cared of) only to run and buy a couple of these Kaiser rolls being sold at our corner bakery. I am sure back then they called these something other than Kaiser Rolls, since little rolls baked in honor of Franz Joseph I of Austria would have gone against the grains of communism. Maybe they called them Lenin Rolls? Don’t remember…
Le Pâte Fermentée!
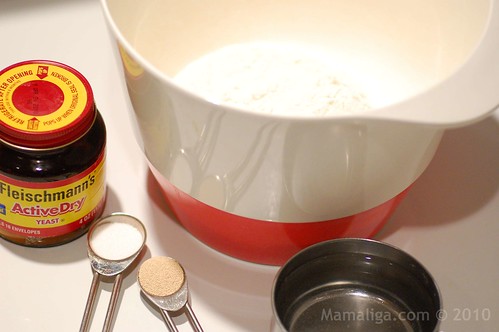
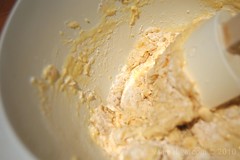
Mesdames et messieurs, je voux present the pre-ferment (go google that up)! Not quite a “greeting pre-close” as google translator suggests but a piece of dough that’s used to improve the flavor of your everyday bread. The key here is TIME. Over time (usually overnight in the fridge) yeast will not only do its burping role due to the CO2 but also will improve the flavor of the dough due to its enzymatic action. So we’ll start with what’s called a pre-ferment, aka Sponge or Poolish as I did while making Bagels or Ciabatta bread. The pre-ferment is somewhat more firmer than Poolish. It starts with five basic components (this recipe makes about 18 oz):
1-1/8 (5 oz) bread flour (unbleached)
¾ tsp salt
¾ to ¾ cup plus 2 tb (6-7 oz) water at room temp
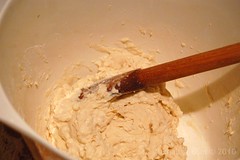
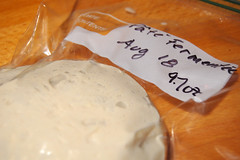
I started by mixing the dry ingredients first then added ¾ cup of the water then folded the mix gently until the flour was hydrated. I ended up adding the extra 2 tb left of the water to have a somewhat sticky dough. Then I kneaded the dough for about 5 min on my counter until I had a tacky dough registering about 75 degrees F. Next, I added the dough to a well oiled bowl and let it sit for 1 h at room temperature (it was a hot day so I had 80 F in the kitchen). The dough had risen quite a lot, so I degassed it (read punch down), covered the bowl with plastic and left it in the fridge overnight. Note that at this point the pre-ferment can be frozen in an air-tight bag for at least 3 months for later use.
The Kaiser Roll Dough
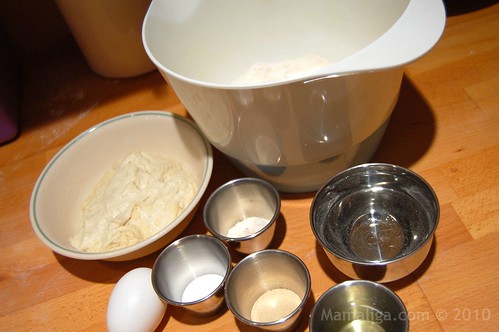
Next day, I pulled the pre-ferment out of the fridge, scooped about 8 ounces of it on the counter (about half), sprayed it lightly with oil, covered it with plastic wrap and left it sit there to take off the chill. I froze the leftover pre-ferment. While my pre-ferment blob was chilling out on the counter, I measured the actual Kaiser Roll ingredients:
1½ cup (8 oz) pre-ferment
2¼ cup (10 oz) bread flour (unbleached)
¾ tsp salt
1 tsp diastatic malt powder
1 tsp instant yeast
1 large egg (slightly beaten)
1 ½ tb vegetable oil
¾ cup (5-6 oz) water
sesame or poppy seeds for topping
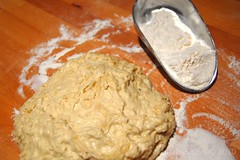
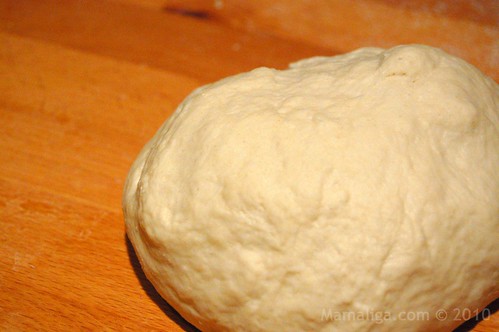
I mixed the dry ingredients together first then added the pre-ferment, water, oil and the lightly beaten egg until I had a ball. Literally! Next I kneaded the daylight out of this dough for about 10 minutes until I had a nice silky surface (the dough, not me), and it passed the Window Pane Test. Then I plopped the dough ball into its place of rest (and rising) a lightly oiled bowl. Covered the bowl in plastic then left it there to rise for little less than 2 hours.
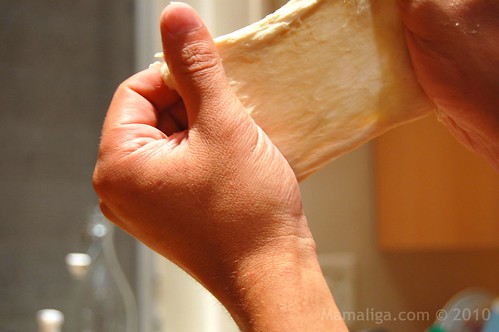
The Windowpane Test
The what? I suppose it is called that because it involves stretching a piece of your dough to a thin translucent membrane (pane) against a source of light (more likely a window) without ripping it apart. But what if you knead your dough at night? I’ll call it the Light Bulb Test then! If the dough holds together, it means that you are done with kneading and you can rest your hands now (or your KitchenAid mixer). If it falls apart then back to kneading a couple more minutes. Gluten is what keeps the world together. Seriously. At least sort of. Otherwise everything would crumble apart. It’s a composite protein (gliadin & glutenin) that forms tiny little strands while you knead your dough, forming an elastic mesh gives bread the chewy characteristic. I don’t expect you to remember that.
Divide and Roll
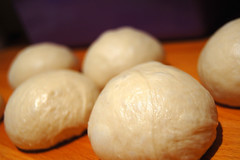
Time was to divide the dough into 6 pieces (about 4 oz each). Then I had to form the rolls. The book had instructed me to use a push-and-rotate movement while holding my hand in a cup shape. I thought I’d rather do a video than try to explain this in depth. It really works. It is critical to clean your work surface of any flour with a damp cloth – that will increase friction. Try to master this technique, you’ll use it often to shape many kind of breads (dinner rolls for instance). Then I left the rolls to relax after misting them lightly with oil and covered in plastic wrap.

The Actual Kaiser Shaping
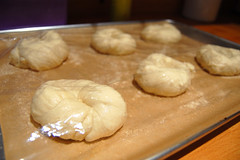
Not sure where the Kaiser and the particular start-pattern of the roll met but I won’t go in detail here except that this can be done with a special Kaiser roll cutter that I didn’t have or by the knotted-roll trick that I managed to handle and even shot another video for you on how this can be done. Start by rolling one of your previous rolls into a 8 inch long cord. Then tie the thing into a multiple knot and try to finish the ends as close to each other as possible. One will stick up the other down.
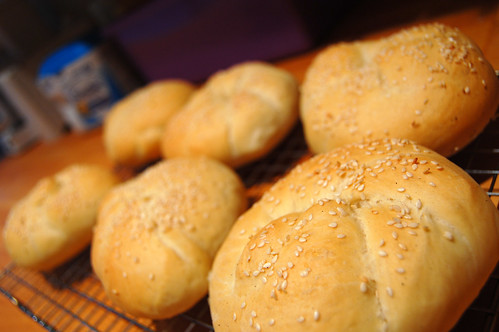
Next, I placed the Kaiser rolls onto a parchment paper lined half baking sheet misted with oil and dusted with a little semolina flour (you can use cornmeal too). Again covered them in plastic wrap, and left them there to proof (rise) for about 1½ hour. Toppings, are traditionally poppy seeds and/or sesame seeds. I used the latest since no one in the house is keen on poppy. Sprayed the rolls first with water so the seeds will stick.

This is the time when your oven should already be blazing hot with 425 degrees F. And make sure you do this on a mid summer 90 degrees F hot and humid day, when your A/C is broken, so you can have a sauna treatment in the same time, OK? Oh, it helps if you live in Florida. I placed my pan in the middle shelf, then sprayed the oven walls with water and shut the door. Then after 10 minutes I lowered the temperature to 400 F and rotated the pan for even browning. At this point I kept peeking inside the oven every 10 minutes or so to check for a nice golden brown and delicious look on my Kaiser Rolls, and pulled them out after about 30 minutes of baking and after checking the inside temperature of one of them that registered 200 F.
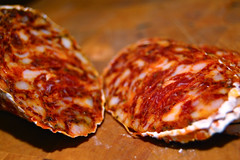
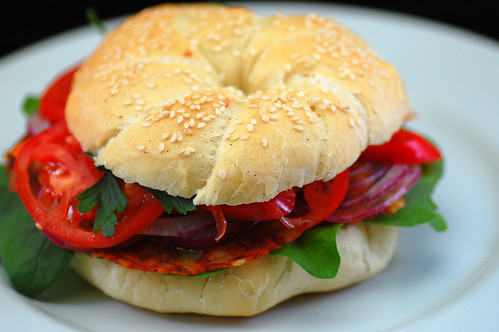
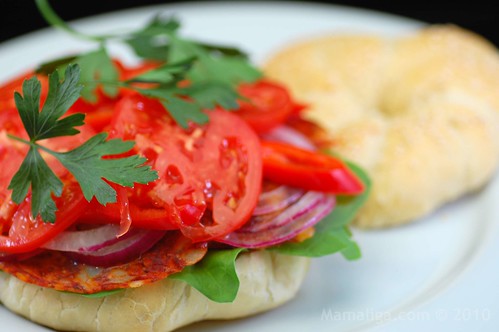
I really had to hold my horses before slicing one in half as they came out of the oven, but the good old book recommends to wait 30 minutes!! With my brilliant planning I always manage to have something to do right when I pull stuff out of the oven – answer phones, drop off or pick-up my daughter for guitar lessons, re-capture our cat that just escaped outside through an open door, etc., so things turn either too much on the dark side or worst, not being able to taste the result for at least 2 hours. But hey, what should I put between the two Kaiser roll slices? I know! The home cured Spanish Chorizo (post soon) I have in my curing chamber since April! This must do a righteous lunch sandwich and it sure did. Specially with goat cheese, fresh home grown tomato slices and spinach! What could be better?


That looks really good although I don’t think I could eat the sausage–I’d have to substitute avocado slices or something.
Arata minunat. Un salut din Romania.
Why not?? Why can’t you eat the sausage? Avocado slices sound cool though!
Mii de multumiri!!
Wow, it seems like you did a lot in those thirty minutes! I hope your cat doesn’t escape daily. I loved your finished product. It looks light and fluffy and you added remarkable ingredients to make the sandwich. I’d love to make something like this. First, I’ll need to master the technique.